
| Version | Date | Comment |
|---|---|---|
| Current Version (v. 5) | Aug 24, 2026 12:12 |
@User
|
| v. 4 | Aug 24, 2026 11:29 |
@User
|
| v. 3 | Aug 21, 2026 21:37 |
@User
|
| v. 2 | Aug 21, 2026 13:17 |
@User
|
| v. 1 | Aug 21, 2026 07:32 |
@User
|
The OneTeg Data Store is a place to keep your own tables of data inside OneTeg — product lists, customer codes, mapping tables, run logs, anything your integrations need to read or remember. You create the table in your browser, and your flows read and write its rows.
Who this guide is for. Anyone who is new to OneTeg. It starts from the very first click and assumes no technical background. Sections 1 to 7 cover working with your data in the browser. Section 8 is the one to read if you want a flow to use the data — it walks through building a flow step from scratch. Sections 9 to 12 are reference material you can come back to.
1. What the Data Store is
Think of a spreadsheet that lives inside OneTeg instead of on your computer. It has:
-
Tables — one table per kind of thing you are keeping. "Product Catalog", "Country Codes", "Customers To Sync".
-
Fields — the columns of the table. Each field has a name you choose ("Price") and a type that says what kind of value it holds (a number, a date, a yes/no).
-
Rows — the actual records. One product per row.
Two things make it different from a spreadsheet on your computer, and both matter:
-
Your flows can use it. A flow step can read rows, look one up, add one, change one or delete one. That is what Section 8 is about.
-
It belongs to your organization. Tables you create are visible only to your own organization. Nobody in another organization can see them, or even find out that they exist, unless you deliberately share the table with them (Section 7).
Why you would use it
Some jobs that the Data Store does well:
-
A reference table your flows look things up in. Country codes, tax rates, warehouse names, a mapping between your product codes and a partner's product codes.
-
A staging area. Load a supplier's CSV into a table, then let a flow work through it.
-
A memory between runs. A flow writes down what it has already processed, so the next run does not repeat itself.
-
A small application database. When there is no other system that owns the data, and putting it in a spreadsheet somewhere would mean nobody could automate it.
Data Store and Data Store +
Your left-hand menu may show two entries. They are two different things:
|
Menu entry |
What it is |
|---|---|
|
Data Store |
The built-in tier, included with OneTeg. Tables live inside OneTeg itself. This guide is about this one. |
|
Data Store + |
An optional add-on with a richer spreadsheet-style editor and no row ceiling. It is a separate product with its own workspace and its own connector. Your tenant is required to be assigned for Data Store+. Also ask your administrator to assign your organization for a Data Store+ workspace to start working with it. |
You can use both side by side. A single flow can even have one step reading from Data Store and the next reading from Data Store +.
2. Before you start
Finding the Data Store
Click Data Store in the menu on the left. You land on the list of tables your organization can reach.
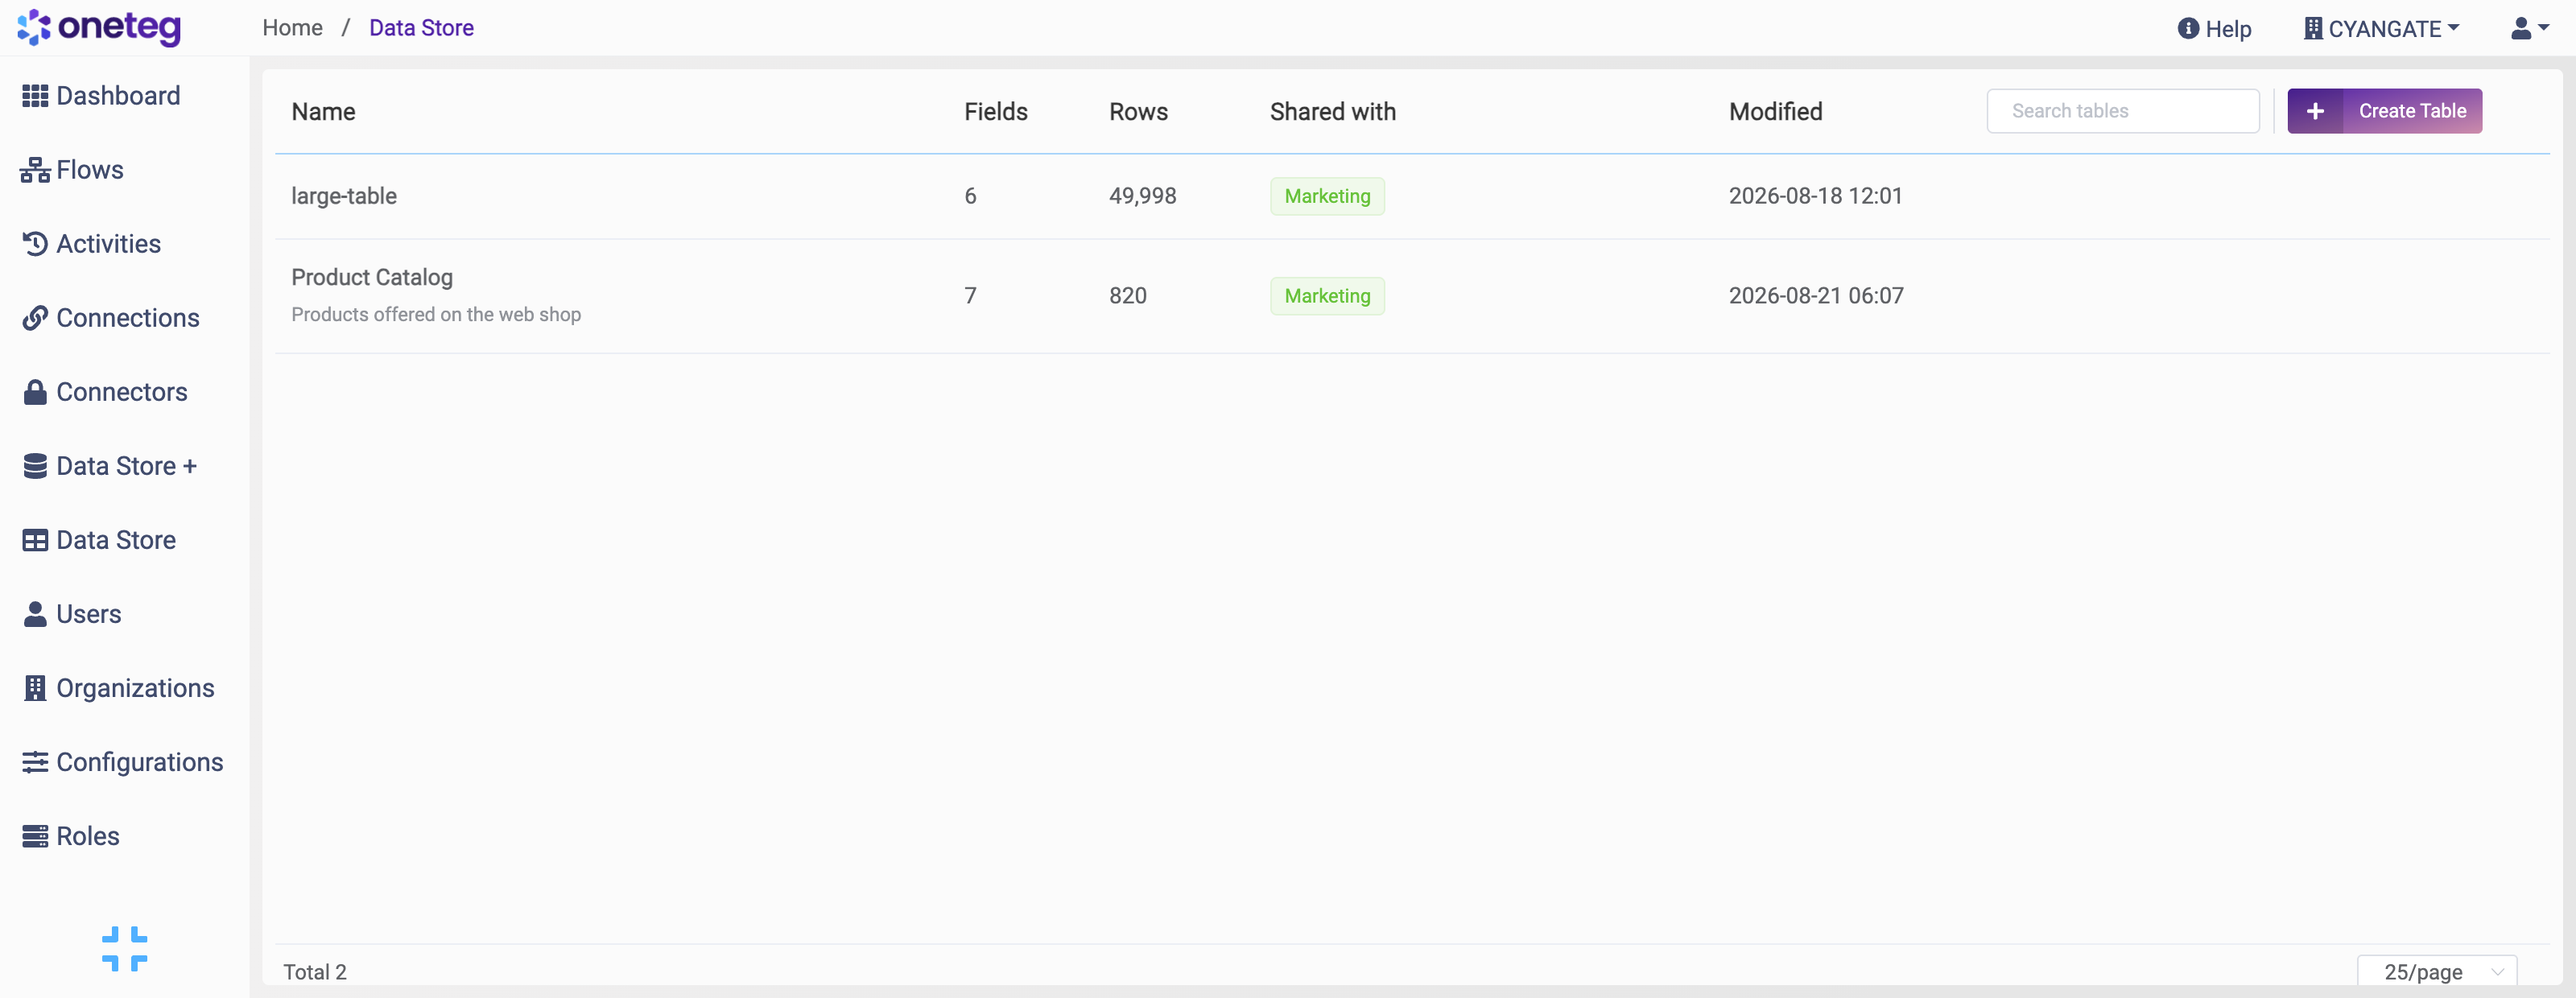
The Data Store table list. "Shared with" tells you which other organizations you have given access to; a dash means the table is private to your organization.
The list shows, for every table: its name and description, how many fields and rows it has, who it is shared with, and when it last changed. Click any row to open it.
What you are allowed to do
Your OneTeg administrator decides what you can do in the Data Store, by giving your role a set of permissions. If a button described in this guide is missing for you, that is almost always the reason — ask your administrator.
|
You want to… |
Permission your role needs |
|---|---|
|
See the Data Store menu item and open tables |
View Data Store |
|
Read the rows of a table |
View Data Store Data |
|
Add, change or delete rows |
Edit Data Store Data |
|
Create a table, or copy one |
Create Data Store Table |
|
Rename a table, or add and change its fields |
Edit Data Store Table |
|
Move a table to the trash, or restore it |
Delete Data Store Table |
|
Load a CSV file into a table |
Import Data Store Data |
|
Download a table as CSV |
Export Data Store Data |
|
Share a table with another organization |
Share Data Store Table |
By default a OneTeg administrator has all nine of these, and ordinary users and staff can view and export but not change anything. Section 12 shows an administrator how to change that.
3. Your first table
There are two ways to start. If you already have the data in a CSV file, use the second one — it is faster and it works out the fields for you.
3.1 Create an empty table
-
On the Data Store page, click Create Table.
-
Type a Name. This is just a label; you can change it later without touching the data.
-
Optionally add a Description, which appears under the name in the table list.
-
Click Create.
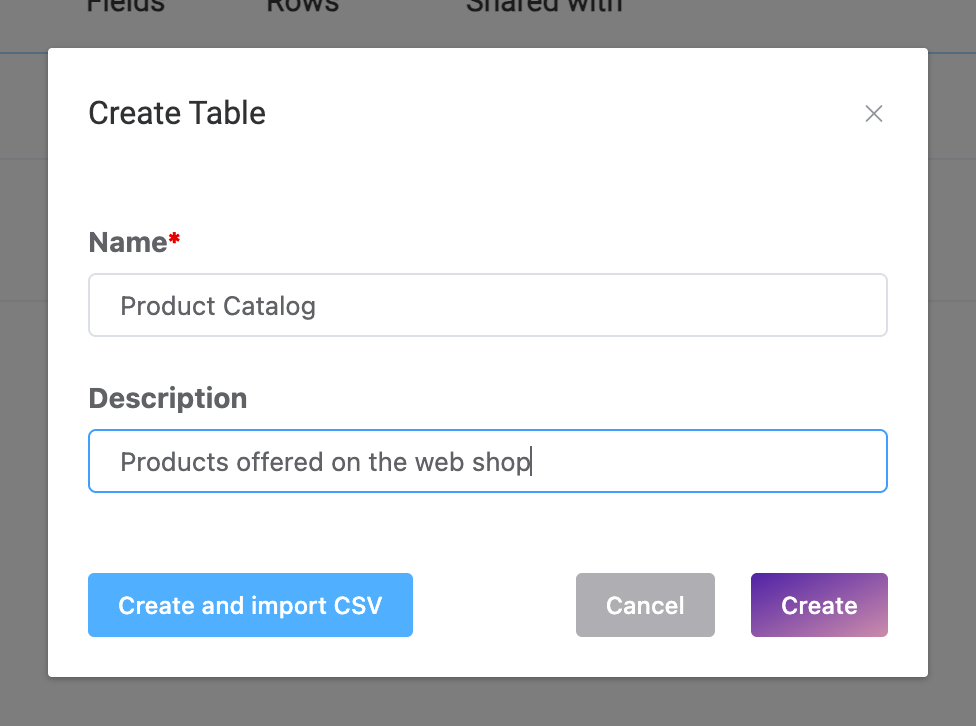
The Create Table dialog. "Create and import CSV" does the same thing but opens the import wizard immediately afterwards.
The new table opens with a single field called Name. That field is the table's primary field — see Section 5 for what that means. Add the rest of your fields as described in Section 5.2.
3.2 Create a table from a CSV file (recommended)
This is the quickest way to get real data in, and it is worth walking through in full because the same wizard is used every time you import.
-
Click Create Table, give it a name, and click Create and import CSV.
-
Upload. Drop your CSV file on the box, or click it and pick the file. OneTeg reads the file and tells you what it found: the size, roughly how many rows, and that it has taken the first line as the column headings.
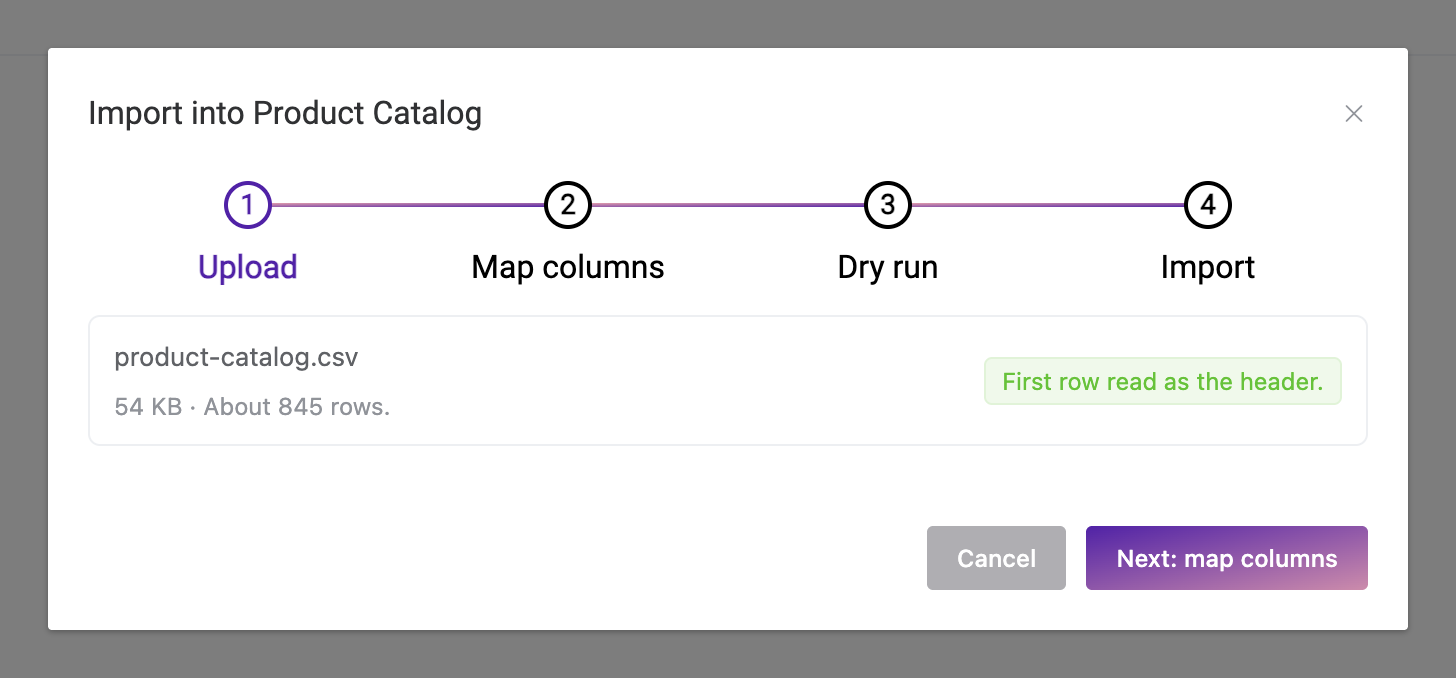
Step 1, Upload. The green tag confirms the first row was read as the header rather than as data.
-
Map columns. This is the important step. For every column in your file, OneTeg shows a sample value, guesses the right field type, and offers three choices under Maps to field:
-
Create new field — make a new field named after the CSV column. This is the default and usually what you want.
-
An existing field name — put this column's values into a field the table already has.
-
Skip this column — ignore the column completely.
-
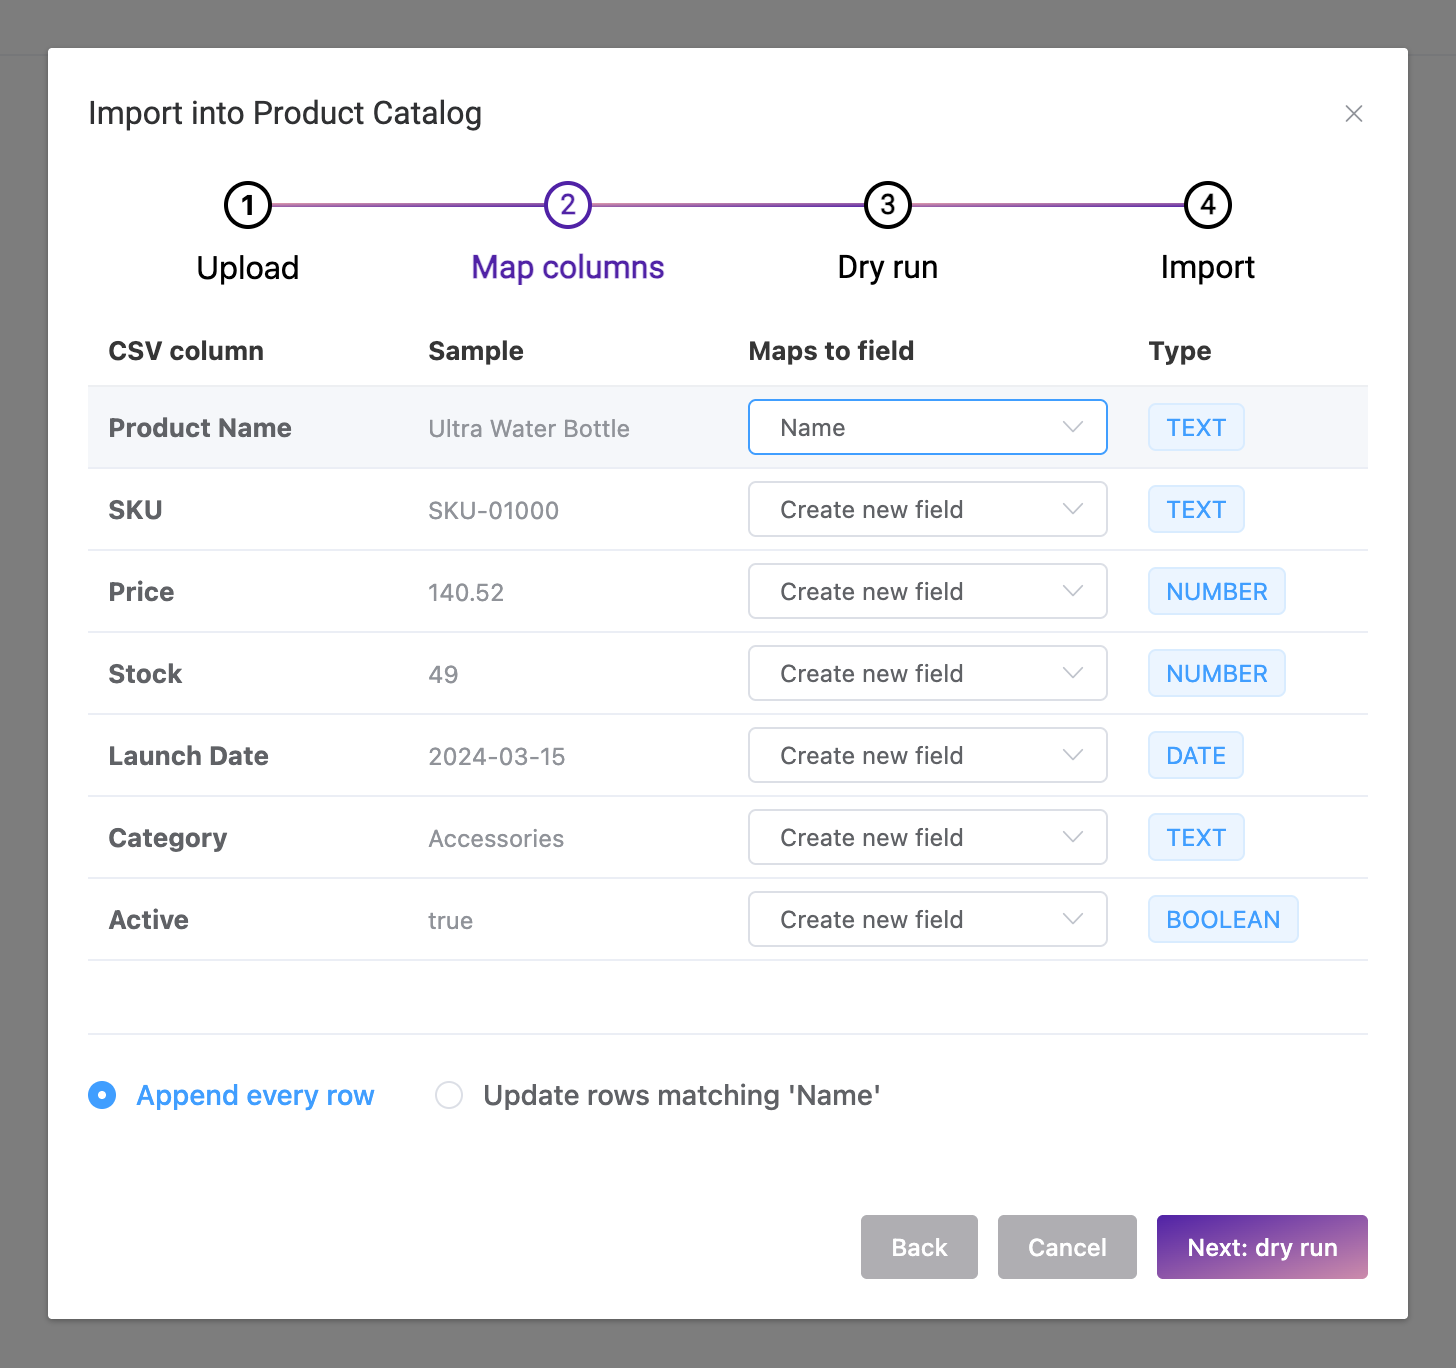
Step 2, Map columns. Here the first CSV column has been pointed at the table's existing Name field, and the remaining six will each create a new field. The Type column shows what OneTeg worked out from the sample values.
Tip. Point one of your columns at the existing Name field rather than skipping it. That field is required, so if nothing fills it every row will fail.
Below the list you choose how the rows should be written:
-
Append every row — every line in the file becomes a new row. Use this for a first load.
-
Update rows matching '<field>' — where a row already has the same value in that field, update it instead of adding a duplicate. Use this when you are refreshing a table you have loaded before.
-
Dry run. OneTeg checks a sample of your rows against the field types without writing anything, and tells you how many would go in cleanly and how many would not. Nothing has changed in your table yet, so if the numbers look wrong you can go Back and fix the mapping.
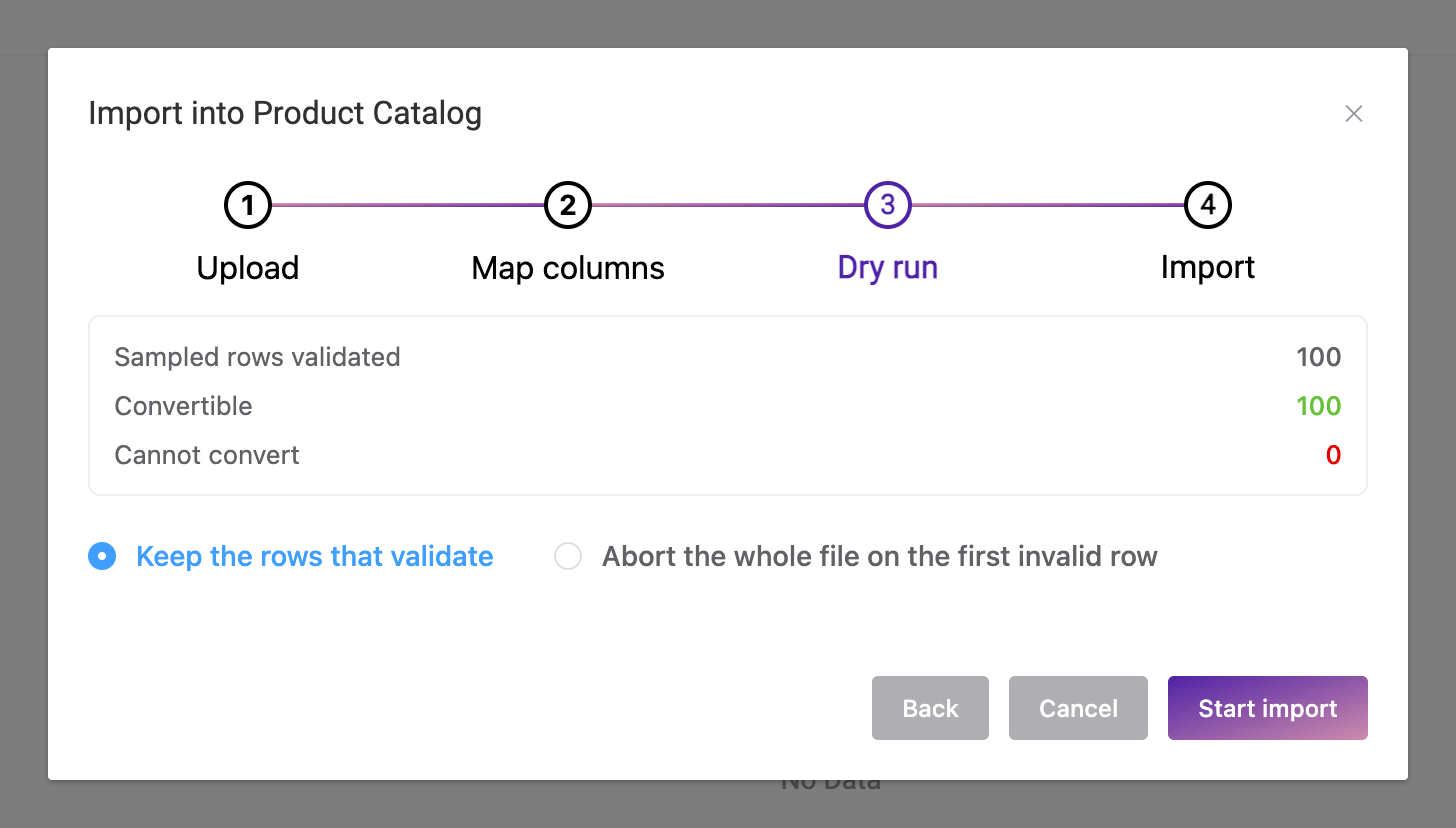
Step 3, Dry run. All 100 sampled rows are convertible, so this import is safe to start.
You also choose what should happen if a row further down the file turns out to be invalid:
-
Keep the rows that validate — import everything that is good and report the rest. Usually the right choice.
-
Abort the whole file on the first invalid row — all or nothing.
-
Import. Click Start import. The import runs in the background, so you get a progress bar and you are free to close the dialog — the button even says so. When it finishes you get a short report of what it did.
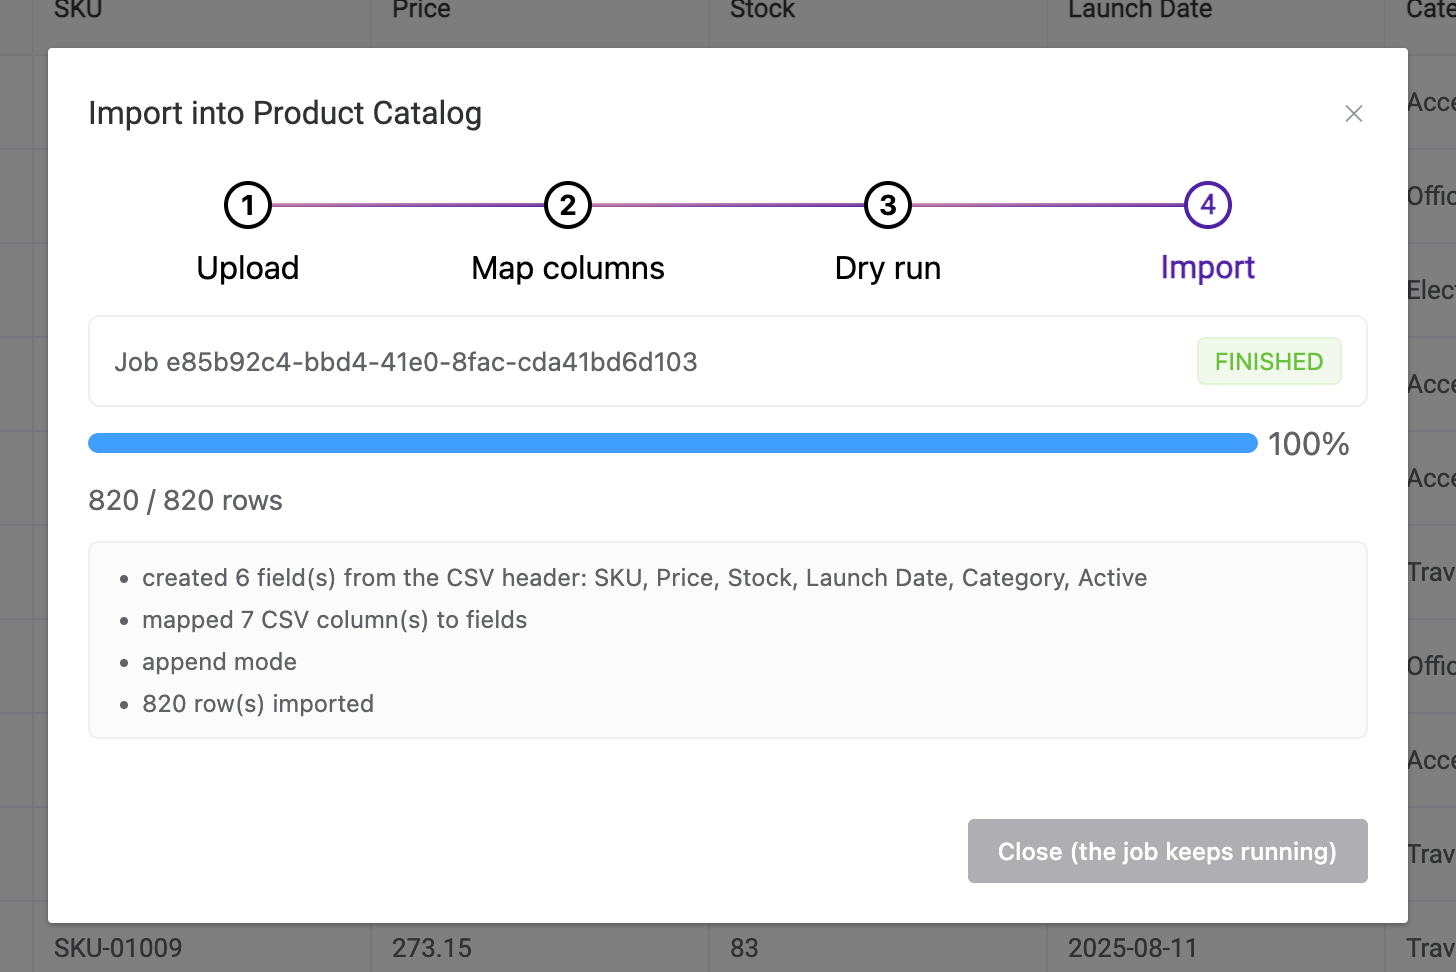
Step 4, Import. 820 rows loaded and six fields created from the CSV header. The report is worth reading: it names every field it created.
4. Working with rows in your browser
Opening a table shows its rows in a grid, with the row count and field count under the name.
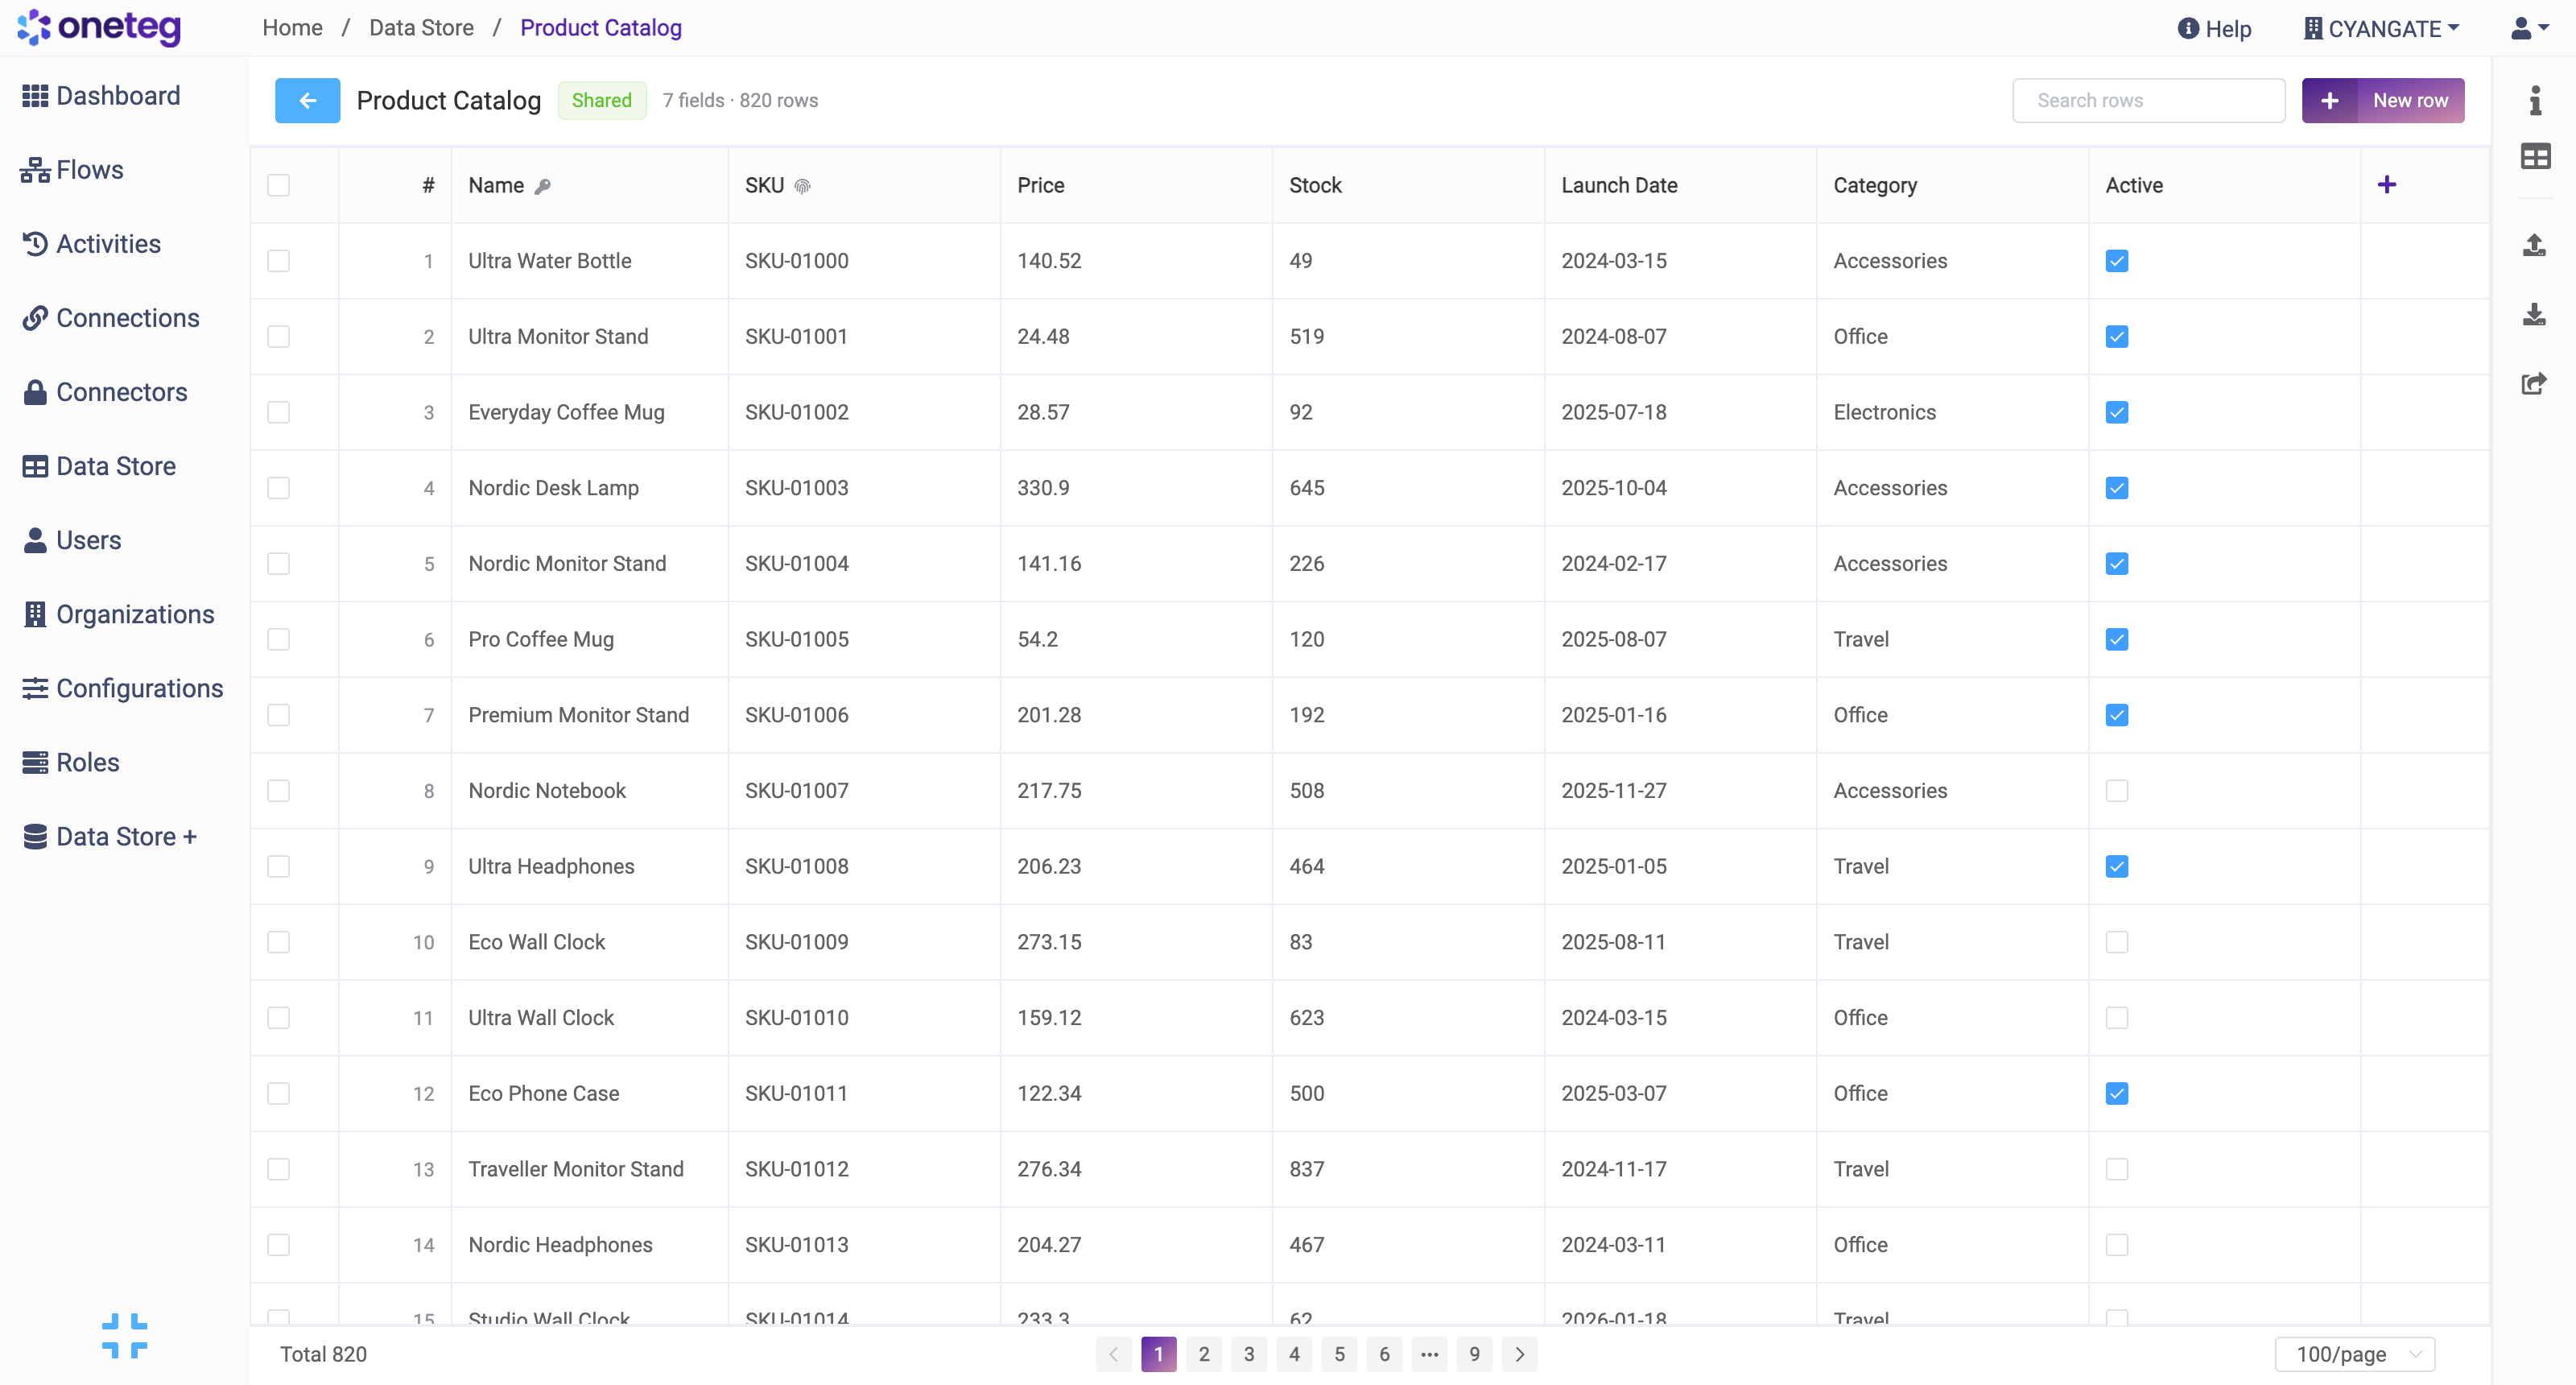
A table with 820 rows. The key icon beside Name marks the primary field. The icons down the right-hand edge are, from the top: table details, fields, import, export and share.
Moving around
-
Paging. Use the pager at the bottom. You can change how many rows you see per page.
-
Searching. Type in Search rows at the top right. It matches across the table's text fields.
On a very large table, searching or sorting a field that has no database index means reading the whole table, so it is slower. If that happens OneTeg warns you. Section 5.3 shows how to add an index to a field you search often.
Changing a value
The fastest way is to double-click the cell, type the new value and press Enter. OneTeg checks the value against the field's type before saving, so a word typed into a number field is refused immediately rather than stored.
Adding a row
Click New row at the top right. A panel opens on the right with one input per field, each labelled with its type. Fill it in and click Save row.
Opening one row on its own
Click the row number at the left of any row. The same panel opens, filled in, so you can read and edit a wide row without scrolling sideways.
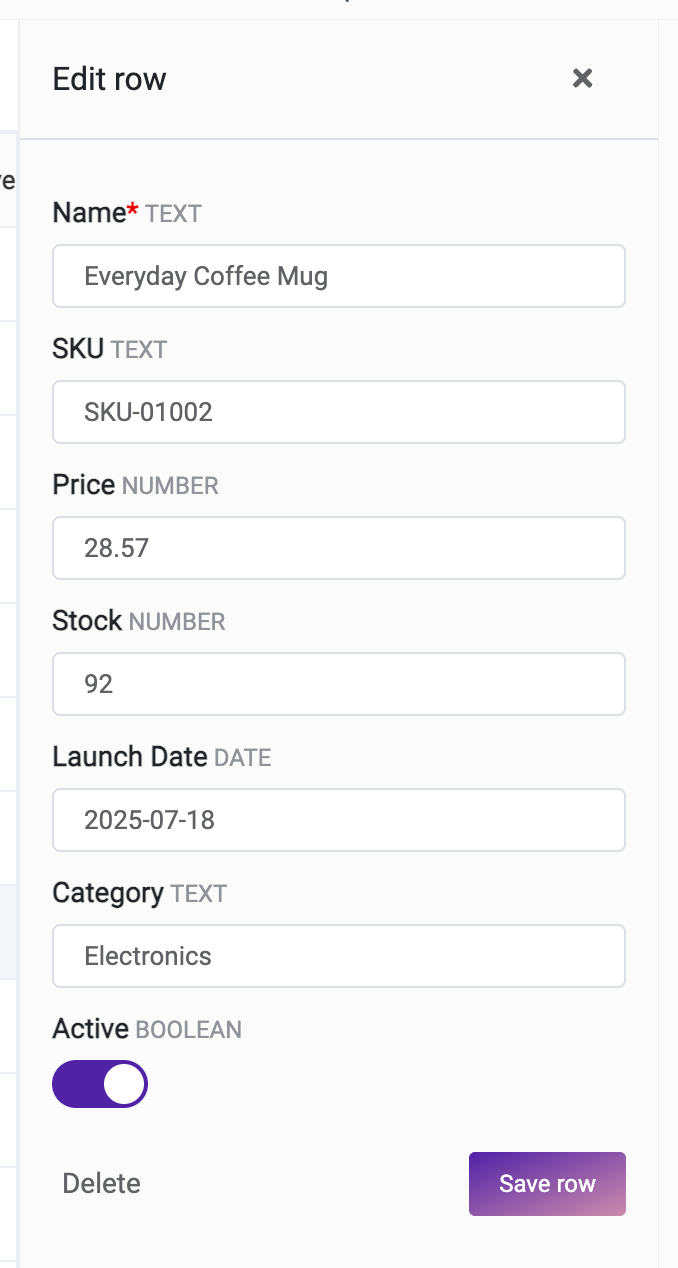
One row on its own. Every field shows its type, and the primary field is marked with an asterisk because it is required.
Deleting rows
Tick the boxes on the left of the rows you want gone, then click Delete selected. Or open a single row and click Delete.
Deleting rows is permanent. Unlike deleting a whole table, deleting rows does not go through the trash and cannot be undone. If you are not sure, export the table first (Section 6.2).
5. Designing the fields
Click the table icon on the right-hand edge to open the field list. It shows every field in order, with its type, and marks the primary field.
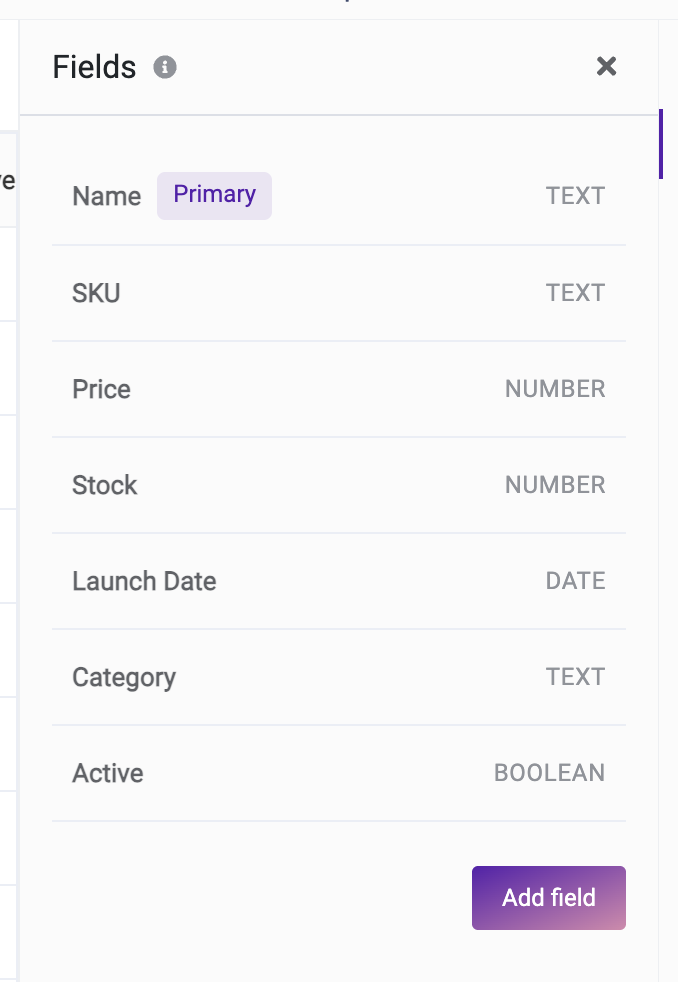
The field list. Click any field to edit it, or Add field at the bottom to make a new one.
5.1 The field types
Choosing the right type is worth a moment's thought: it is what stops bad data getting in, and it decides how the value is handled in a flow.
|
Type |
Holds |
Use it for |
|---|---|---|
|
TEXT |
Any short text |
Names, codes, SKUs, e-mail addresses. The everyday choice. |
|
LONG_TEXT |
Long text |
Descriptions, notes, anything with paragraphs. |
|
NUMBER |
A number, whole or decimal |
Prices, quantities, weights. Thousands separators and spaces in an imported value are stripped for you. |
|
BOOLEAN |
True or false |
Yes/no flags: "Active", "Processed". |
|
DATE |
A calendar date |
Launch dates, due dates. Written as |
|
DATETIME |
A date and a time |
Timestamps: when a row was last synchronised. |
|
SINGLE_SELECT |
One of a fixed list you define |
Statuses and categories. Values that do not match one of your options are refused, which keeps the list clean. |
|
UUID |
A unique identifier |
Keys copied from another system. |
An empty value is stored as "no value" for every type. It is never turned into a zero or an empty string.
5.2 Adding a field
-
Open the field list and click Add field.
-
Give it a Display name and pick a Type.
-
Set the three switches as needed (below).
-
Click Create field.
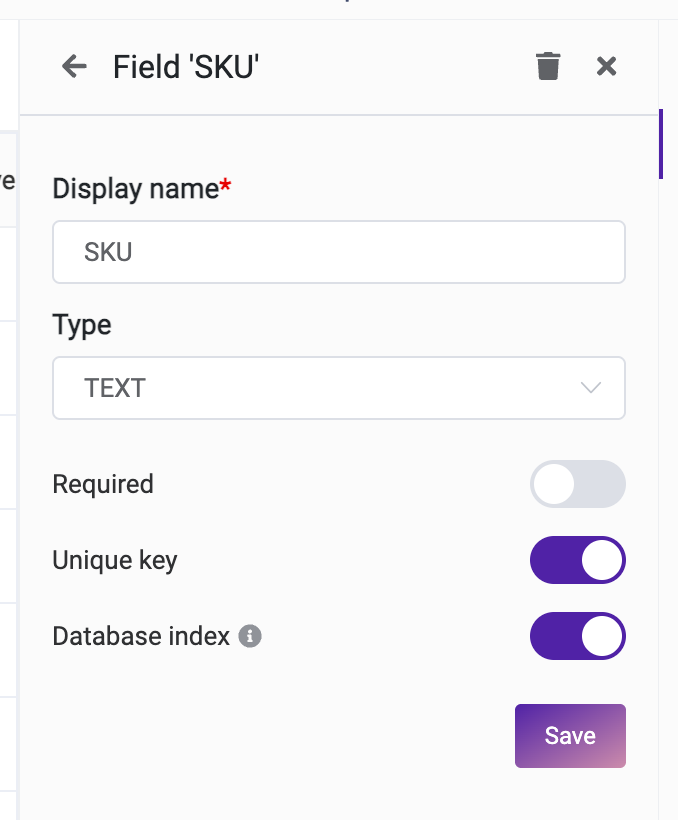
Editing a field. Here the SKU field has been marked as a unique key and given a database index.
5.3 The three switches
|
Switch |
What it does |
When to turn it on |
|---|---|---|
|
Required |
A row cannot be saved with this field empty. |
For the handful of fields a record is meaningless without. |
|
Unique key |
No two rows may hold the same value in this field. |
For your own identifiers — SKU, customer number, e-mail. This is also what makes the Upsert action in a flow possible (Section 8.8), so if a flow will keep this table in step with another system, mark the matching field unique. |
|
Database index |
Makes searching and sorting this field fast on a large table. |
On fields you search or sort often. There is no reason to index every field — an index costs a little on every write. |
5.4 The primary field
Every table has exactly one primary field, marked with a key icon in the grid. It is the field that defines the unique identifier of each row, it is always required, and it cannot be deleted. It is also the field the Upsert action matches on when you do not name another one.
You can move that role to a different field with change primary field, and you can rename the primary field like any other. Note that LONG_TEXT and BOOLEAN fields cannot be primary.
5.5 Renaming a field
Change the Display name and save. Renaming is safe: the stored data is untouched, and nothing else in OneTeg breaks.
One exception. If a flow step sends or reads cells by field name — which is the normal way, see Section 8.4 — then renaming a field means the flow is now using a name that no longer exists. Update the step at the same time as the field.
5.6 Changing a field's type
You can change a field's type after it has data in it, and OneTeg will not let you do so blindly. The moment you pick a new type it runs a dry run over every row and tells you exactly how many values would survive the change and how many would not, with examples.
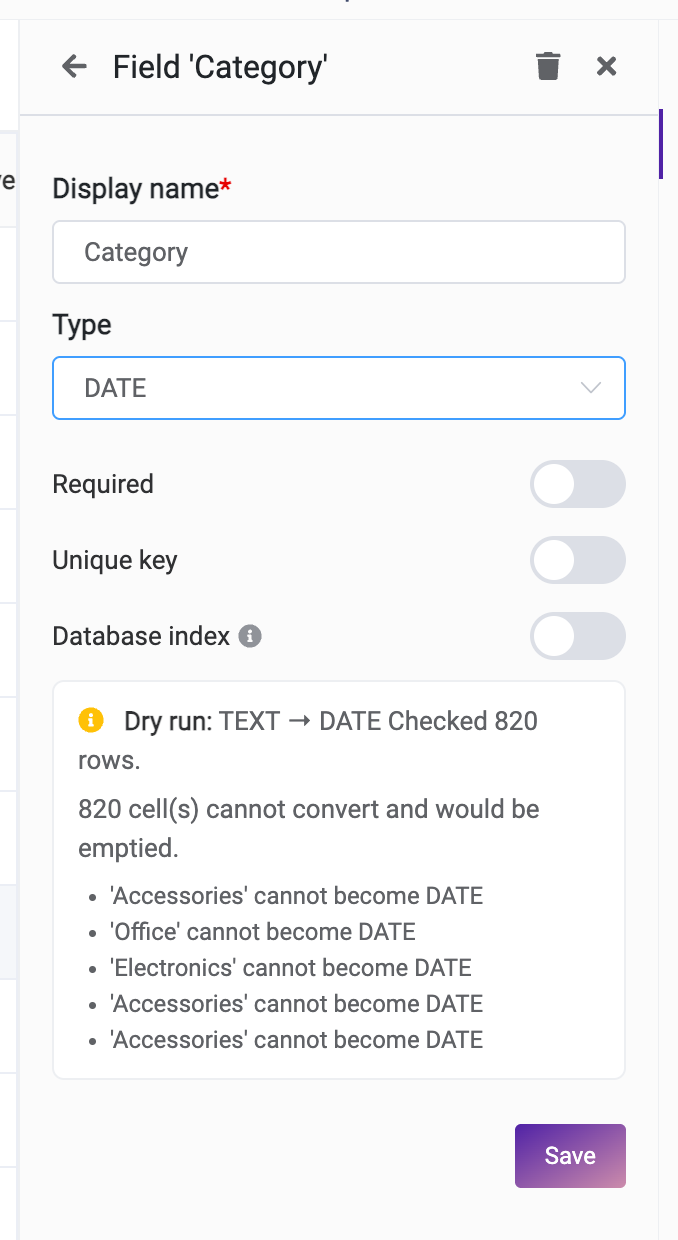
A dry run that says no. Turning this text field into a date would empty all 820 cells, and it names the values that cannot be converted. The right response here is to leave the type alone.
If the dry run looks acceptable, save. The conversion then runs as a background job — the table stays usable while it works.
Values that cannot convert are emptied, not left alone. Read the dry-run numbers before you save. If it says 820 cells cannot convert, saving will empty 820 cells.
5.7 Deleting a field
Open the field and click the bin icon. The field and its data disappear from the table, but they are recoverable within your tenant's retention window (Section 10) — so a mistake here is not fatal, as long as you notice it reasonably soon.
5.8 Table details and usage
Click the i icon on the right-hand edge for the table's own settings: its display name, its description, who owns it, and — most useful — how much of its row allowance it has used.
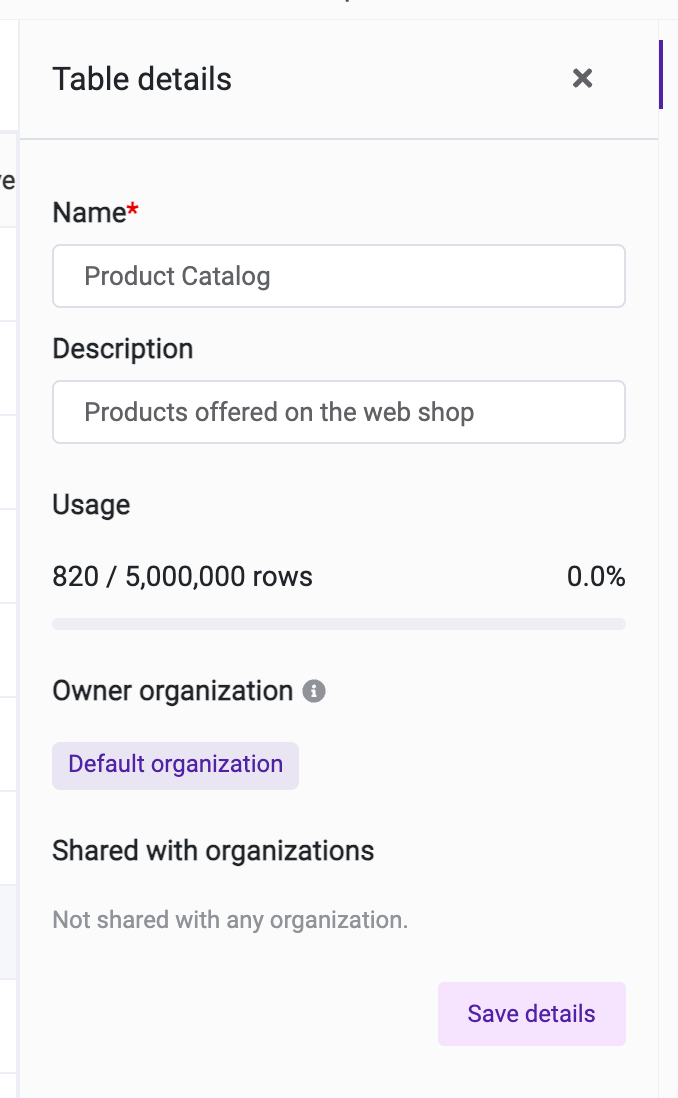
Table details. The Usage gauge is the number your tenant's limit is actually measured against, so this is the place to check before a large import.
6. Importing and exporting
6.1 Importing into a table that already exists
Open the table and click the upload icon on the right-hand edge. This is the same four-step wizard as Section 3.2, so everything there applies. Two things are worth repeating:
-
Choose Update rows matching '<field>' rather than Append every row when you are re-loading a file you have loaded before, or you will end up with two copies of everything.
-
Only one import, type change or copy can run on a table at a time. If you start a second one you will be told the table is busy; wait for the first to finish.
Files up to 2 GB can be imported by default, and OneTeg loads them in chunks rather than all at once, so a large file does not need to succeed or fail as one lump.
6.2 Exporting a table
Click the download icon on the right-hand edge. The dialog tells you how many rows will be written.
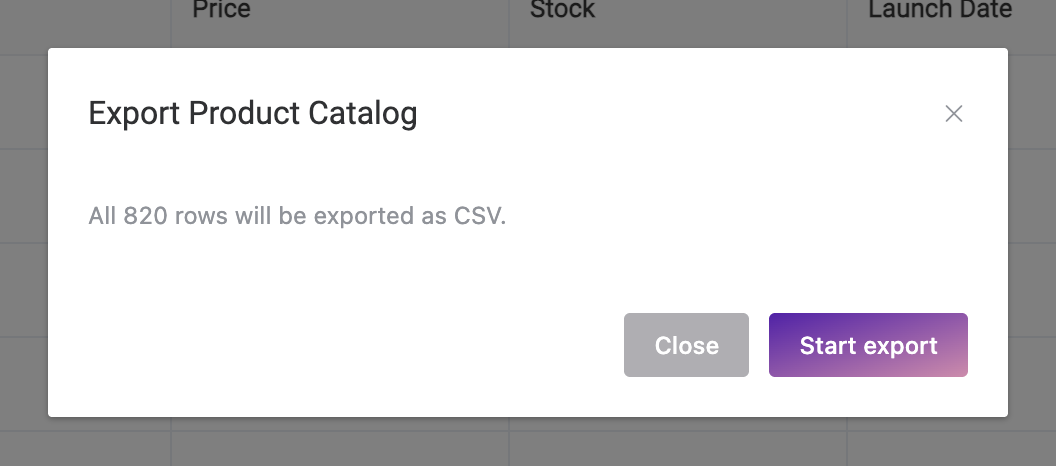
Export. Click Start export, wait for it to reach 100%, then click Download.
The export runs in the background and produces a CSV file. Column headings are your field display names, so the file is readable and can be imported straight back in.
7. Sharing a table with another organization
By default a table is visible only to the organization that created it. Sharing lets you give another organization in your tenant access to it, at a level you choose.
Sharing has to be switched on for your whole tenant before the option appears. If you do not see the share icon, or the panel for picking organizations is missing, ask your OneTeg administrator to enable table sharing.
7.1 The three access levels
|
Level |
Read rows |
Add and change rows |
Add, retype and delete fields |
|---|---|---|---|
|
Read |
Yes |
No |
No |
|
Read and write |
Yes |
Yes |
No |
|
Modify structure |
Yes |
Yes |
Yes |
No level lets the other organization delete the table, copy it into their own organization, or share it onward. Those stay with you as the owner, always.
Modify structure includes deleting fields. An organization with that level can delete a field from your table, and its data with it. Grant it only where you would be comfortable with that.
7.2 Sharing a table
-
Open the table and click the share icon on the right-hand edge.
-
In the left panel, Add organizations, tick the organizations you want. There is a search box for long lists.
-
Pick the level in Grant as and click the arrow to move them across.
-
They now appear in the right panel, Organizations with access, where you can change any one of them individually.
-
Click Save. Nothing is applied until you do — until then the dialog says Unsaved changes.
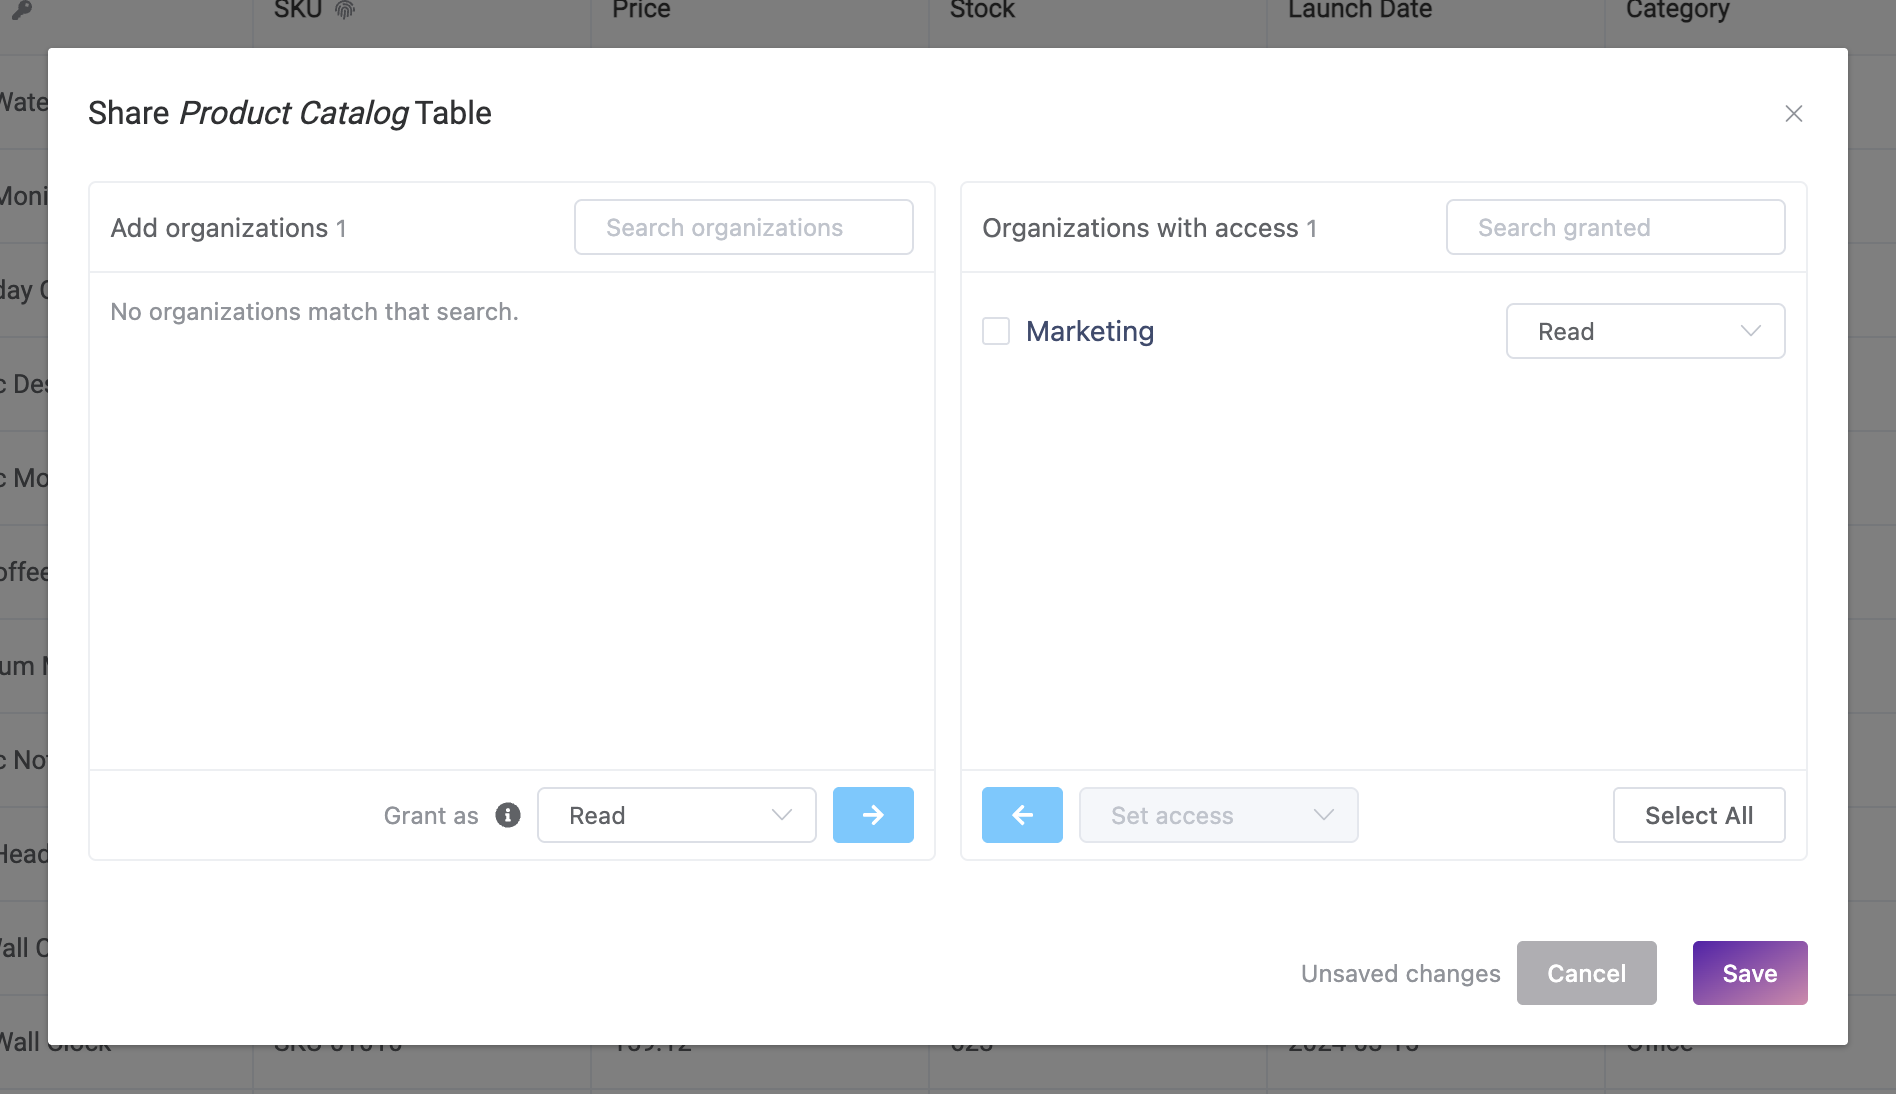
The share dialog. Marketing has been given Read access to this table and is waiting to be saved.
7.3 Taking access away
Tick the organization in the right panel and use the back arrow, or use Set access to lower its level instead. Save. Revoking always works, even if table sharing has since been switched off for the tenant.
7.4 What a shared table looks like to the other organization
It appears in their Data Store list alongside their own tables. They can open it and read it, and write to it if you gave them that level. What they cannot do is delete it, duplicate it or share it. If you later revoke their access, the table simply stops appearing for them — from their side it is as though it never existed.
8. Using the Data Store in a flow
This is what the Data Store is really for. A flow step can read your table, look a record up, add rows, change rows and delete rows. This section builds one from nothing.
8.1 There is no connection to create
Most connectors in OneTeg need a Connection first — a saved object holding a URL and a credential. The Data Store does not. OneTeg already knows who you are and which organization you belong to, so the step authenticates itself.
In practice this means: do not go to the Connections page looking for something to set up. Go straight to your flow.
8.2 Adding a Data Store step
-
Open a flow, or click Create Flow and give it a name.
-
Click the + Add box on the canvas. A panel opens on the right for the new step.
-
Give the step a Name — something that says what it does, like "Read products".
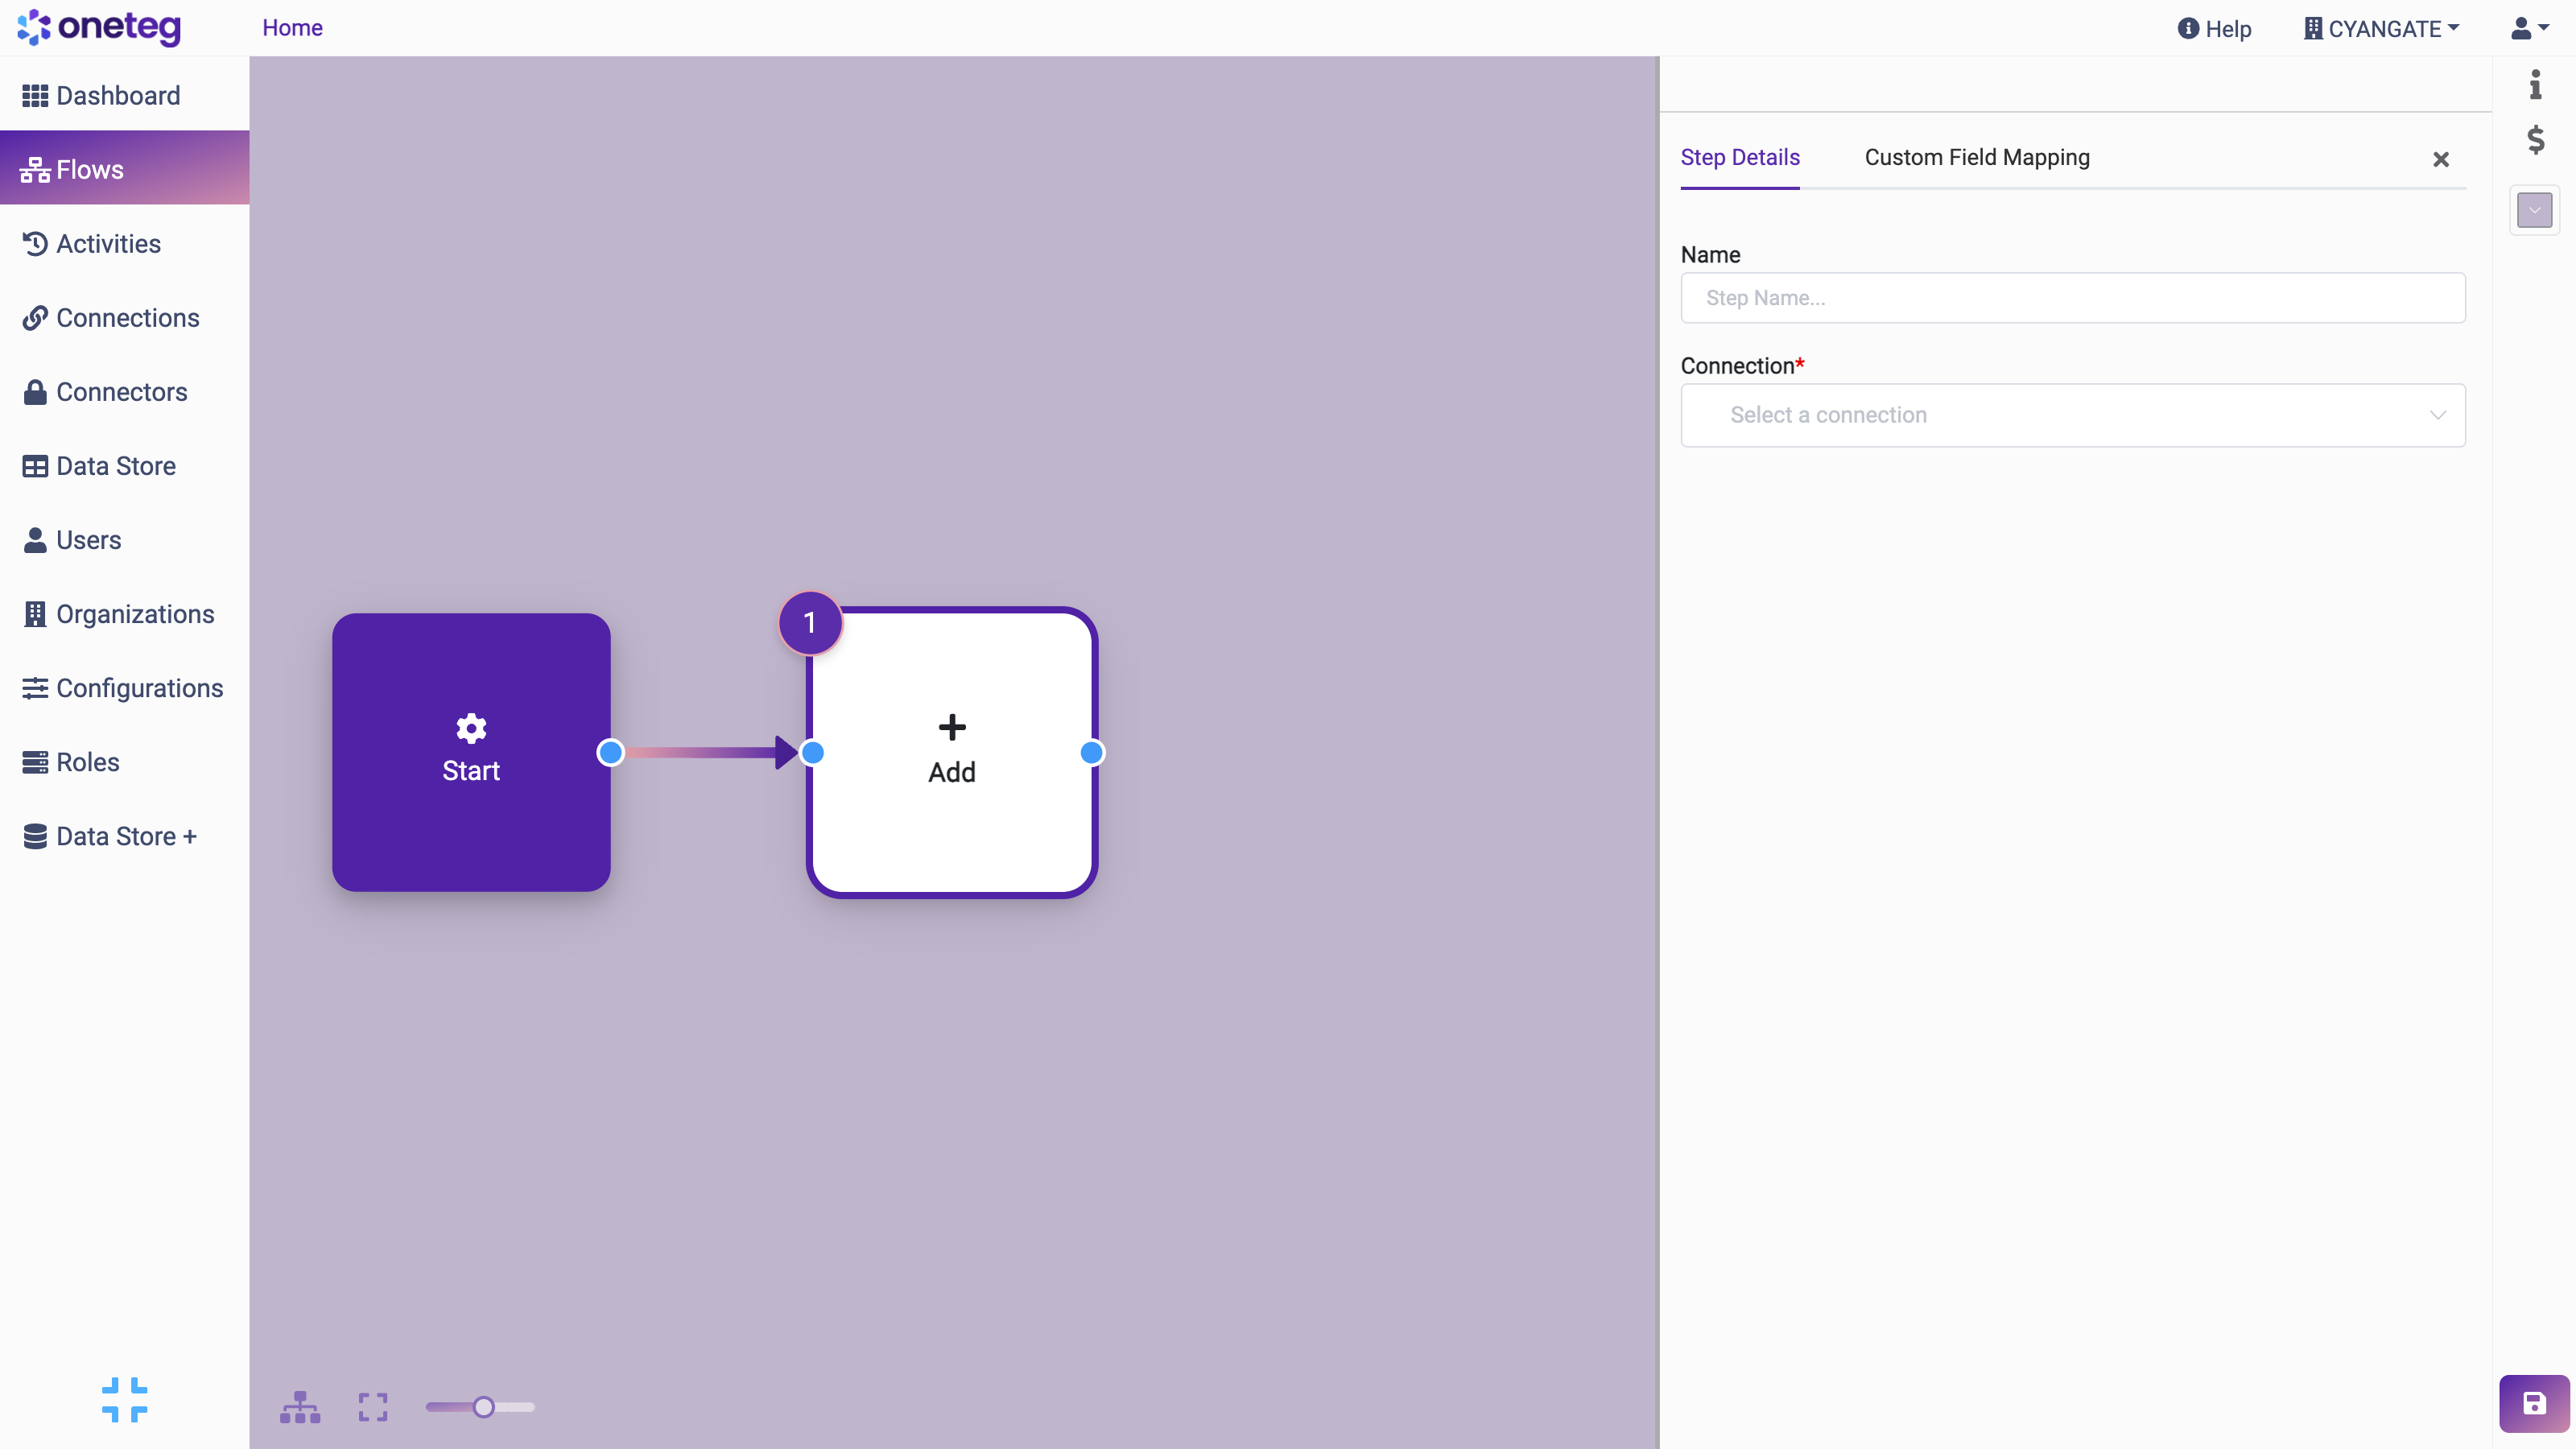
A new step. Everything you need is in this panel: name it, choose what it talks to, choose what it does.
-
Open the Connection list and scroll down to the Tools group. Choose Data Store Connector.
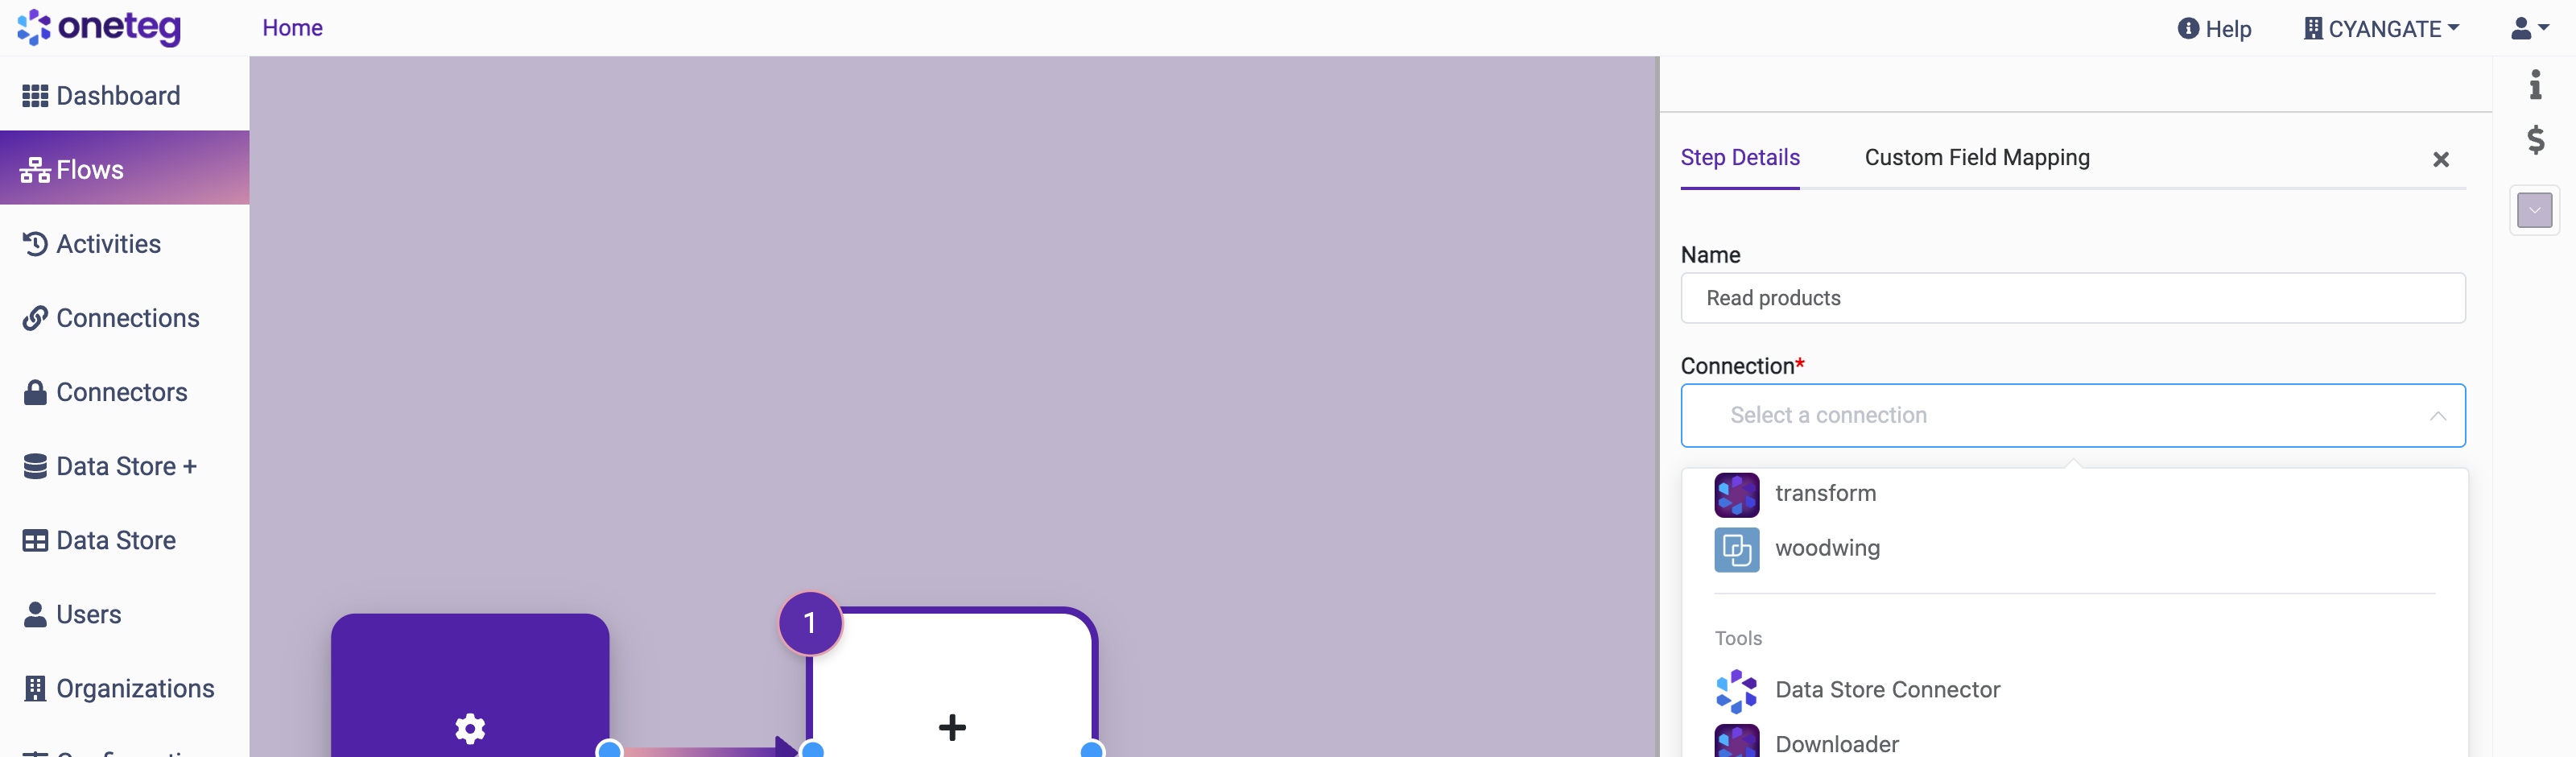
The Connection list, scrolled to the Tools group. "Data Store Connector" is the connector itself, not a saved connection — which is why it sits under Tools instead of Core.
If your tenant has been running for a while you may also see an older entry called "Data Store Connection" in the Core group. Ignore it. New steps take Data Store Connector from Tools.
-
Open the Action list and pick what the step should do. There are eight to choose from.
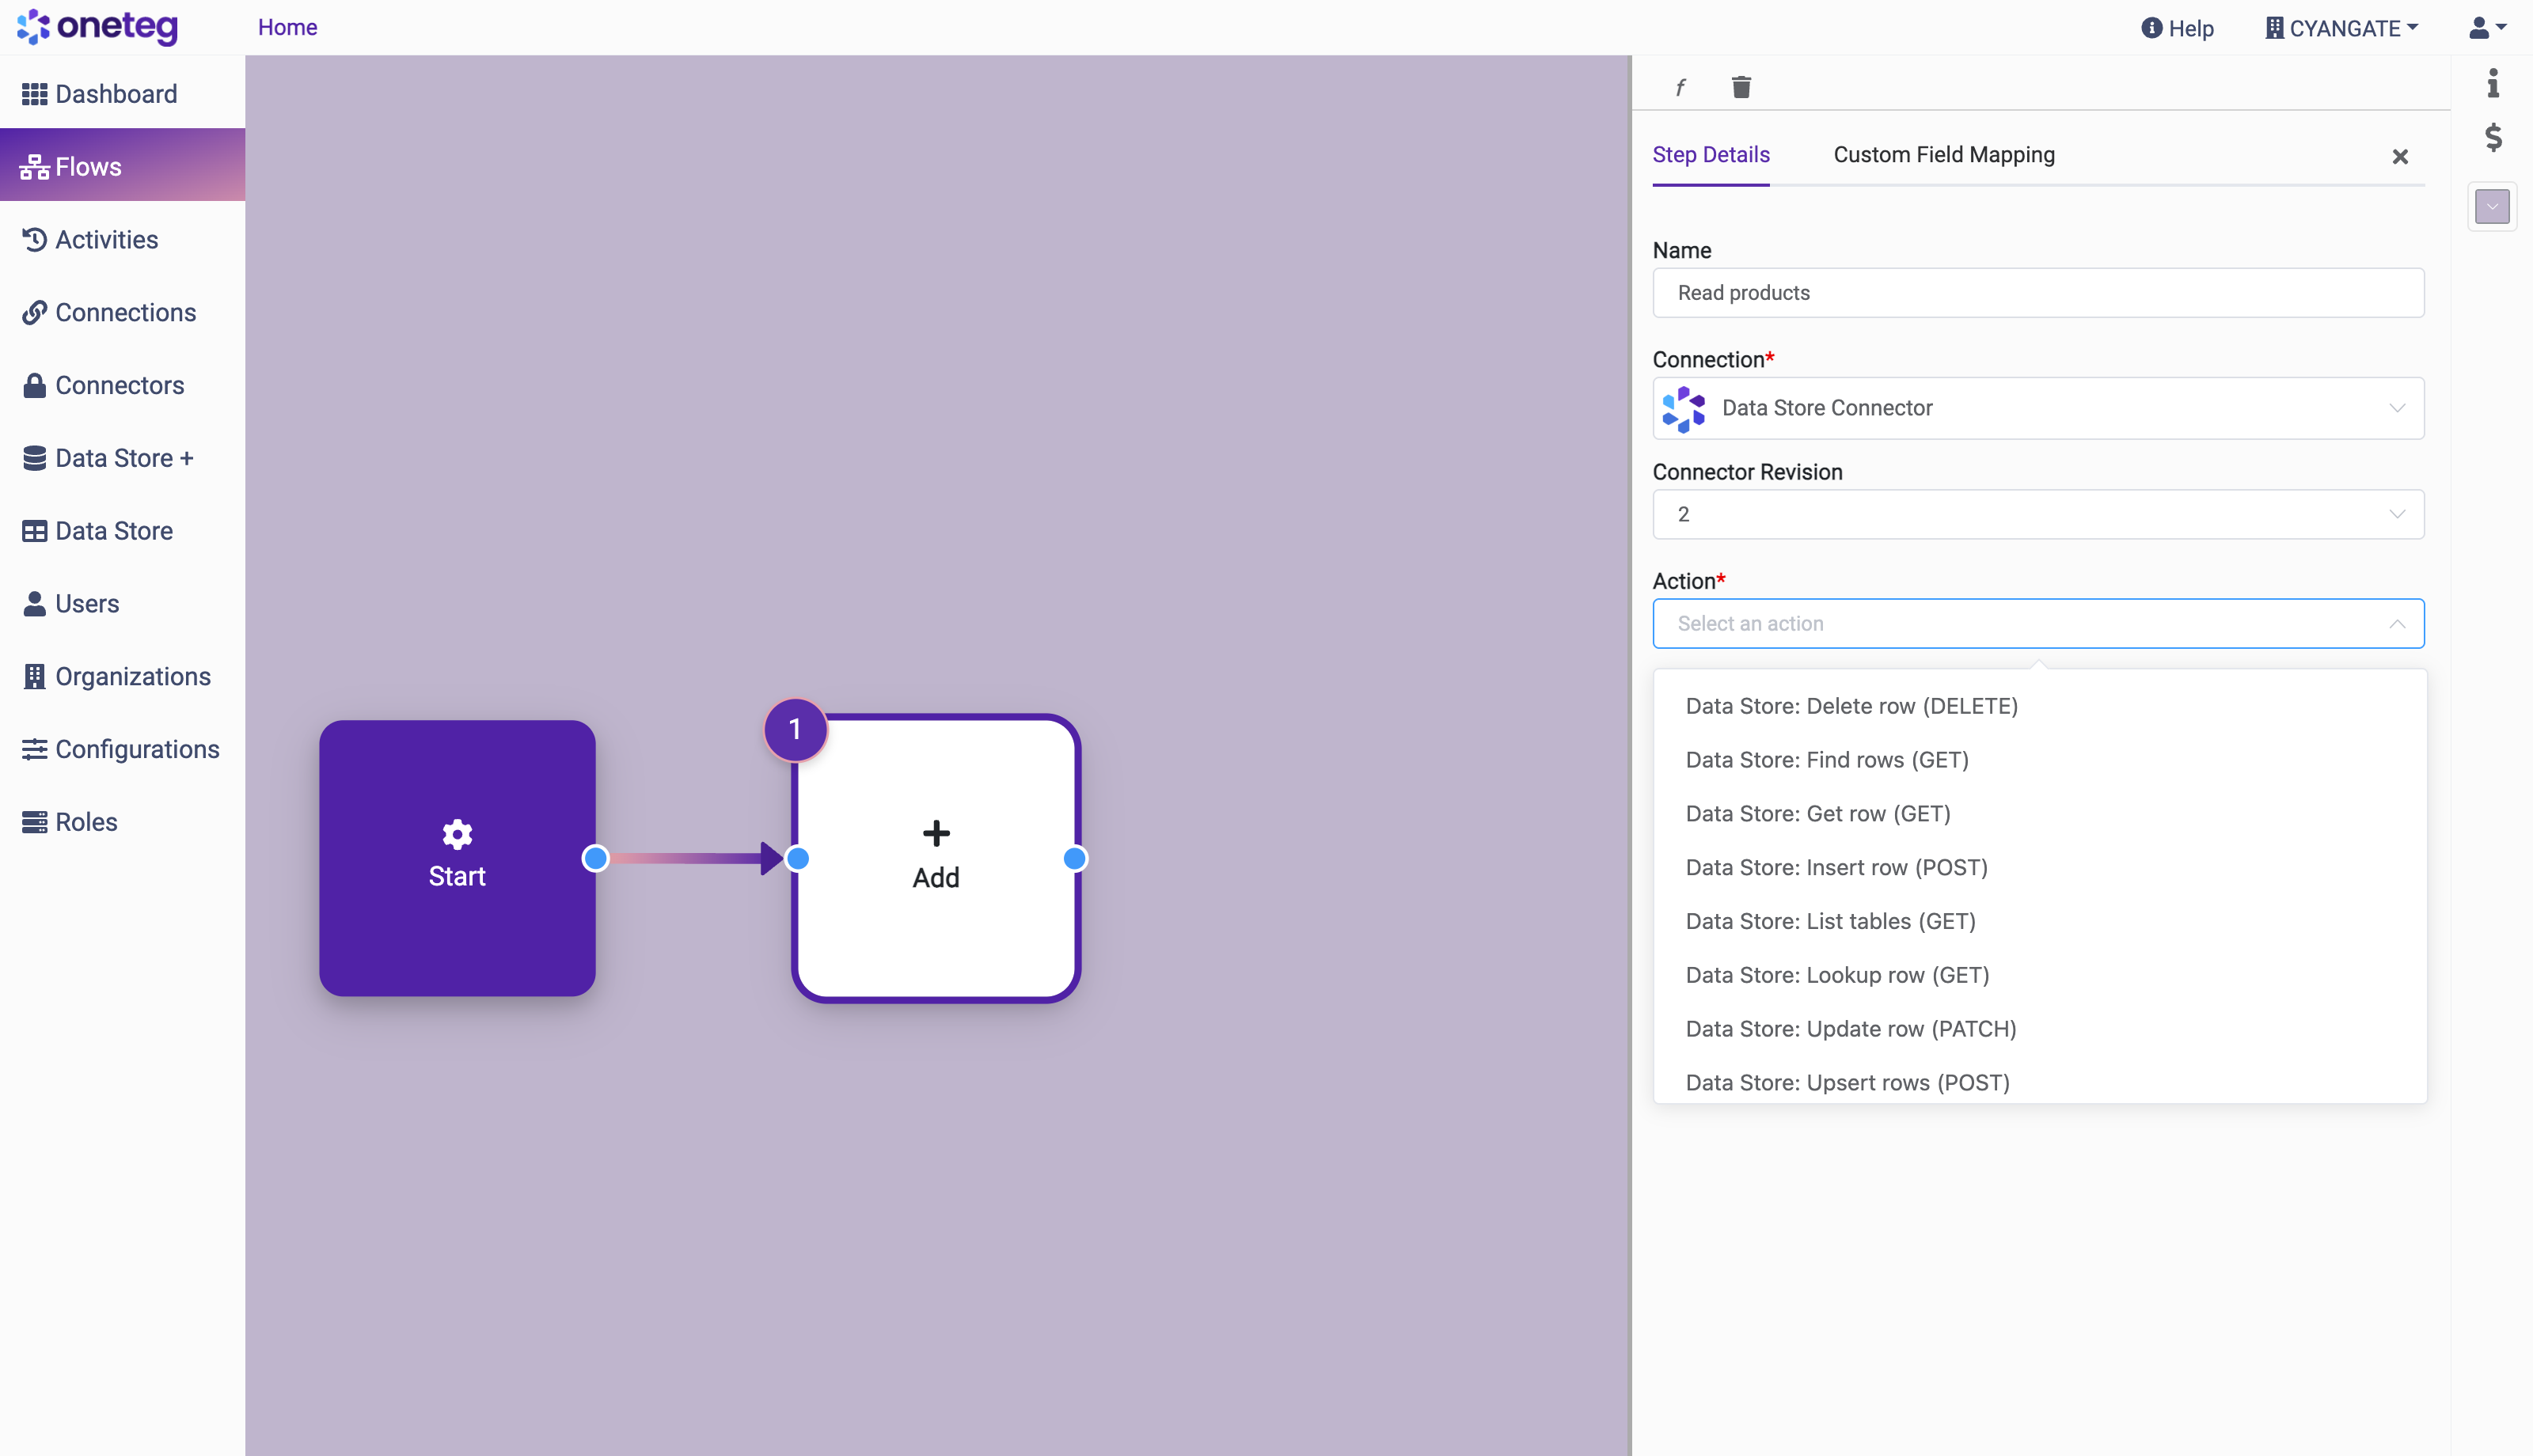
The eight Data Store actions.
-
Fill in the settings the action needs (they change per action) and save the flow.
8.3 The eight actions
|
Action |
What it does |
Reach for it when… |
|---|---|---|
|
List tables |
Returns every Data Store table your organization can reach, each with its fields. |
…you need to find a table's id, or a field's id, from inside the flow rather than hard-coding it. |
|
Find rows |
Returns a page of rows, optionally filtered by a search term. |
…you want to work through a table, or read a slice of it. |
|
Lookup row |
Returns the first row whose chosen field equals a value. Returns nothing at all if there is no match. |
…you are asking "does this record already exist?" |
|
Get row |
Returns one row by its row id. |
…an earlier step already gave you the row id. |
|
Insert row |
Creates one new row. |
…you know the record is new. |
|
Update row |
Changes the cells you send on one existing row, by row id. Cells you do not send are left alone. |
…you have the row id and want to change a couple of values. |
|
Upsert rows |
Writes a batch of rows: creates the ones that are new, updates the ones that already exist, matched on a key field. |
…you are keeping a table in step with another system. Start here — see 8.8. |
|
Delete row |
Deletes one row by its row id, permanently. |
…the record is genuinely gone at the source. |
8.4 Field names, not field ids: the one setting to always check
Every field in the Data Store has both a display name you chose ("Launch Date") and an internal field id that looks like 2b8ea98c-afd4-41ed-af02-cefcd8e60808. Every action can speak either language, and which one it uses is controlled by a single setting in the step: Userfieldnames.
|
Userfieldnames |
Cells are keyed by |
|---|---|
|
true |
The field's display name — |
|
false |
The field id — |
Leave Userfieldnames on true. It is what new steps default to, and it is almost always what you want: a flow has no way to look a field id up, whereas you already know your own field names. The rest of this section assumes true.
8.5 Finding the table id
Most actions need a Tableid. Two ways to get it:
-
From the browser address bar. Open the table in the Data Store; the address ends
/datastore/edit/<table id>. Copy that last part. -
From a preceding step. Add a List tables step first and take the id out of its output. Use this when you would rather the flow not carry a hard-coded id — for example when the same flow is deployed to more than one environment.
8.6 Reading rows
Choose Data Store: Find rows (GET) and fill in:
|
Setting |
Meaning |
|---|---|
|
Tableid |
Required. The table to read. |
|
Size |
How many rows per response. Your tenant caps this (200 by default) and a larger number is quietly trimmed to the cap rather than refused. |
|
Search |
Optional free text, matched across the table's text fields. |
|
After |
How you get the next page. See below. |
|
Page |
Jump straight to page N. Convenient, but limited — see the warning below. |
|
Userfieldnames |
Leave on |
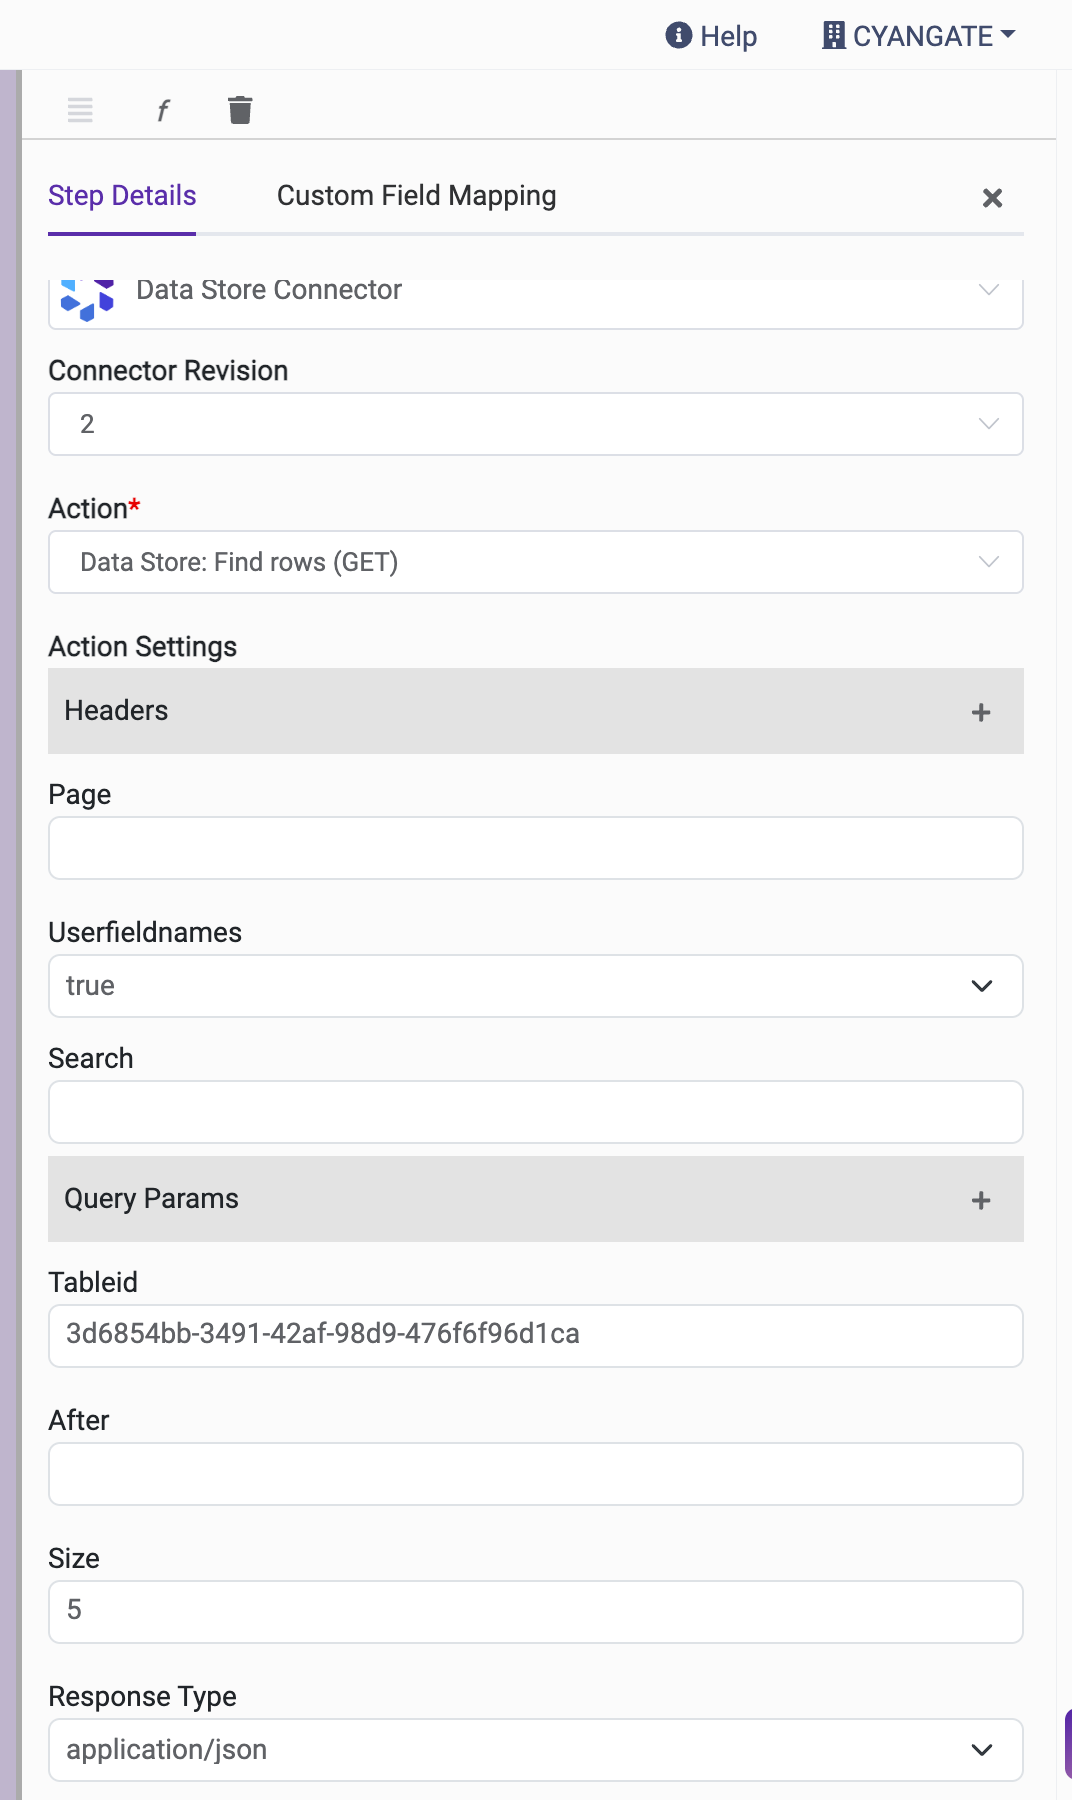
A finished "read the products" step. A table id, five rows per page, field names on. Nothing else was needed — note in particular that there is no credential anywhere on this step.
The step returns something like this:
{
  "rows": [
    {
      "id": "2b7644f9-ed37-4f5f-b3d7-e280b7da9d42",
      "cells": {
        "Name": "Ultra Water Bottle",
        "SKU": "SKU-01000",
        "Price": 140.52,
        "Stock": 49.0,
        "Launch Date": "2024-03-15",
        "Category": "Accessories",
        "Active": true
      }
    },
    {
      "id": "ad3ede38-6eea-4195-9572-0fd7cb9271cb",
      "cells": {
        "Name": "Ultra Monitor Stand",
        "SKU": "SKU-01001",
        "Price": 24.48,
        "Stock": 519.0,
        "Launch Date": "2024-08-07",
        "Category": "Office",
        "Active": true
      }
    }
  ],
  "total": 820,
  "totalExact": true,
  "offset": 0,
  "nextCursor": "My4wMDAwMDAwMDAwMDAwMDAwMDAwMHxhZDNlZGUzOC02ZWVhLTQxOTUtOTU3Mi0wZmQ3Y2I5MjcxY2I"
}
Three parts of that response are worth knowing:
-
rows[].id— the row id. This is what Get row, Update row and Delete row need. -
rows[].cells— your data, keyed by field display name. -
nextCursor— a bookmark for the next page.
Walking through a whole table
To read a table page by page, feed each response's nextCursor into the After setting of the next call. Repeat until nextCursor comes back empty. This works at any depth and stays equally fast on the millionth row as on the first.
Do not walk a large table with Page. Page numbers are a convenience for jumping to a specific place, and they stop working past a limit (100,000 rows by default). Past that you get an error telling you to use a cursor. After has no such limit, so if in doubt use After from the start.
8.7 Checking whether a record already exists
Choose Data Store: Lookup row (GET) and give it:
-
Tableid
-
Field — which field to match on, by display name (for example
SKU) -
Value — the value to look for
If a row matches, you get that one row back, exactly like Get row. If nothing matches, you get an empty response, not an error — because "this record does not exist yet" is a perfectly ordinary answer to the question, and your flow should be able to branch on it rather than fail.
8.8 Writing rows
The three write actions all take a JSON payload in the step's request body. Because the set of cells is different for every table, you supply them as a small JSON object rather than as fixed input boxes.
Insert row — for records you know are new
{
  "cells": {
    "Name": "Studio Desk Mat",
    "SKU": "SKU-09999",
    "Price": 39.00,
    "Stock": 25,
    "Launch Date": "2026-08-01",
    "Category": "Office",
    "Active": true
  }
}
It returns the created row, including the new row id:
{ "id": "e3b3fb5c-cf79-4275-a40b-f9c86af01279", "cells": { "Name": "Studio Desk Mat", "…": "…" } }
Update row — for a change to a row you already have the id of
{ "cells": { "Stock": 42 } }
Only Stock changes; every other cell on that row is left exactly as it was. The action also needs the Rowid setting, which you take from an earlier Find rows or Lookup row step.
Upsert rows — the one to use for keeping a table in step
Upsert takes a batch of rows and decides per row whether to create or update, by matching on a key field:
{
  "keyFieldId": "2b8ea98c-afd4-41ed-af02-cefcd8e60808",
  "rows": [
    { "cells": { "Name": "Pro Coffee Mug",  "SKU": "SKU-01005", "Price": 59.90, "Stock": 140 } },
    { "cells": { "Name": "Studio Desk Mat", "SKU": "SKU-09999", "Price": 39.00, "Stock": 25  } }
  ]
}
and reports what it did:
{ "created": 1, "updated": 1, "deleted": 0, "rows": [ "…the rows it wrote…" ] }
Three rules for keyFieldId:
-
The key field must be marked as a unique key in the field designer (Section 5.3). If it is not, there is nothing for OneTeg to match on. The refusal names the field: "Field 'Name' must be marked unique before it can be used as an upsert key".
-
Leave
keyFieldIdout entirely to match on the table's primary field. This is the simplest option and often the right one — make the primary field the identifier you actually receive from the other system. -
keyFieldIdtakes either the field's display name or its field id. Names are matched ignoring case, and an id is tried first — so a table that happens to have a field named like some other field's id still resolves the way you meant. If the value names no field at all, the step is refused before anything is written, with a message quoting what you sent: "No field 'Sku Code' on this table; keyFieldId takes a field id or a field name". If you would rather not write a name into the step at all, a List tables step earlier in the flow gives you every field's id.
Why upsert is the safe choice. Running the same upsert payload twice has exactly the same result as running it once. So if a flow fails halfway and is retried, or a schedule fires twice, you get no duplicates. An Insert row step in the same position would create a second copy — and, if the field is unique, fail outright.
8.9 Deleting a row
Data Store: Delete row (DELETE) needs the Tableid and the Rowid.
Row deletes from a flow are permanent, exactly as they are in the browser. There is no trash for rows. Think carefully before putting a Delete row step inside a loop.
8.10 A worked example: keeping a catalog in step
A common shape for a flow that receives products from another system and keeps a Data Store table in step with it:
|
Step |
Connector |
Action |
Why |
|---|---|---|---|
|
1 |
The source system |
Read products |
Fetch whatever changed. |
|
2 |
Data Store Connector |
Upsert rows |
Write them in one call. New products are created, known ones updated. Safe to retry. |
|
3 |
Data Store Connector |
Find rows |
Read back what the table now holds, for a report or a downstream step. |
And when the source gives you one record at a time rather than a batch:
|
Step |
Action |
Why |
|---|---|---|
|
1 |
Lookup row on the SKU |
Ask whether you have seen this product before. |
|
2 |
A condition on whether step 1 returned anything |
Branch. |
|
3a |
Insert row |
Nothing came back — it is new. |
|
3b |
Update row with the row id from step 1 |
Something came back — change it. |
Both shapes work. Prefer the first where you can: one Upsert step replaces three steps and a branch, and it is idempotent.
8.11 Testing the step
Save the flow, then use the run button on the right-hand edge of the flow editor. A log window opens and shows what each step did.
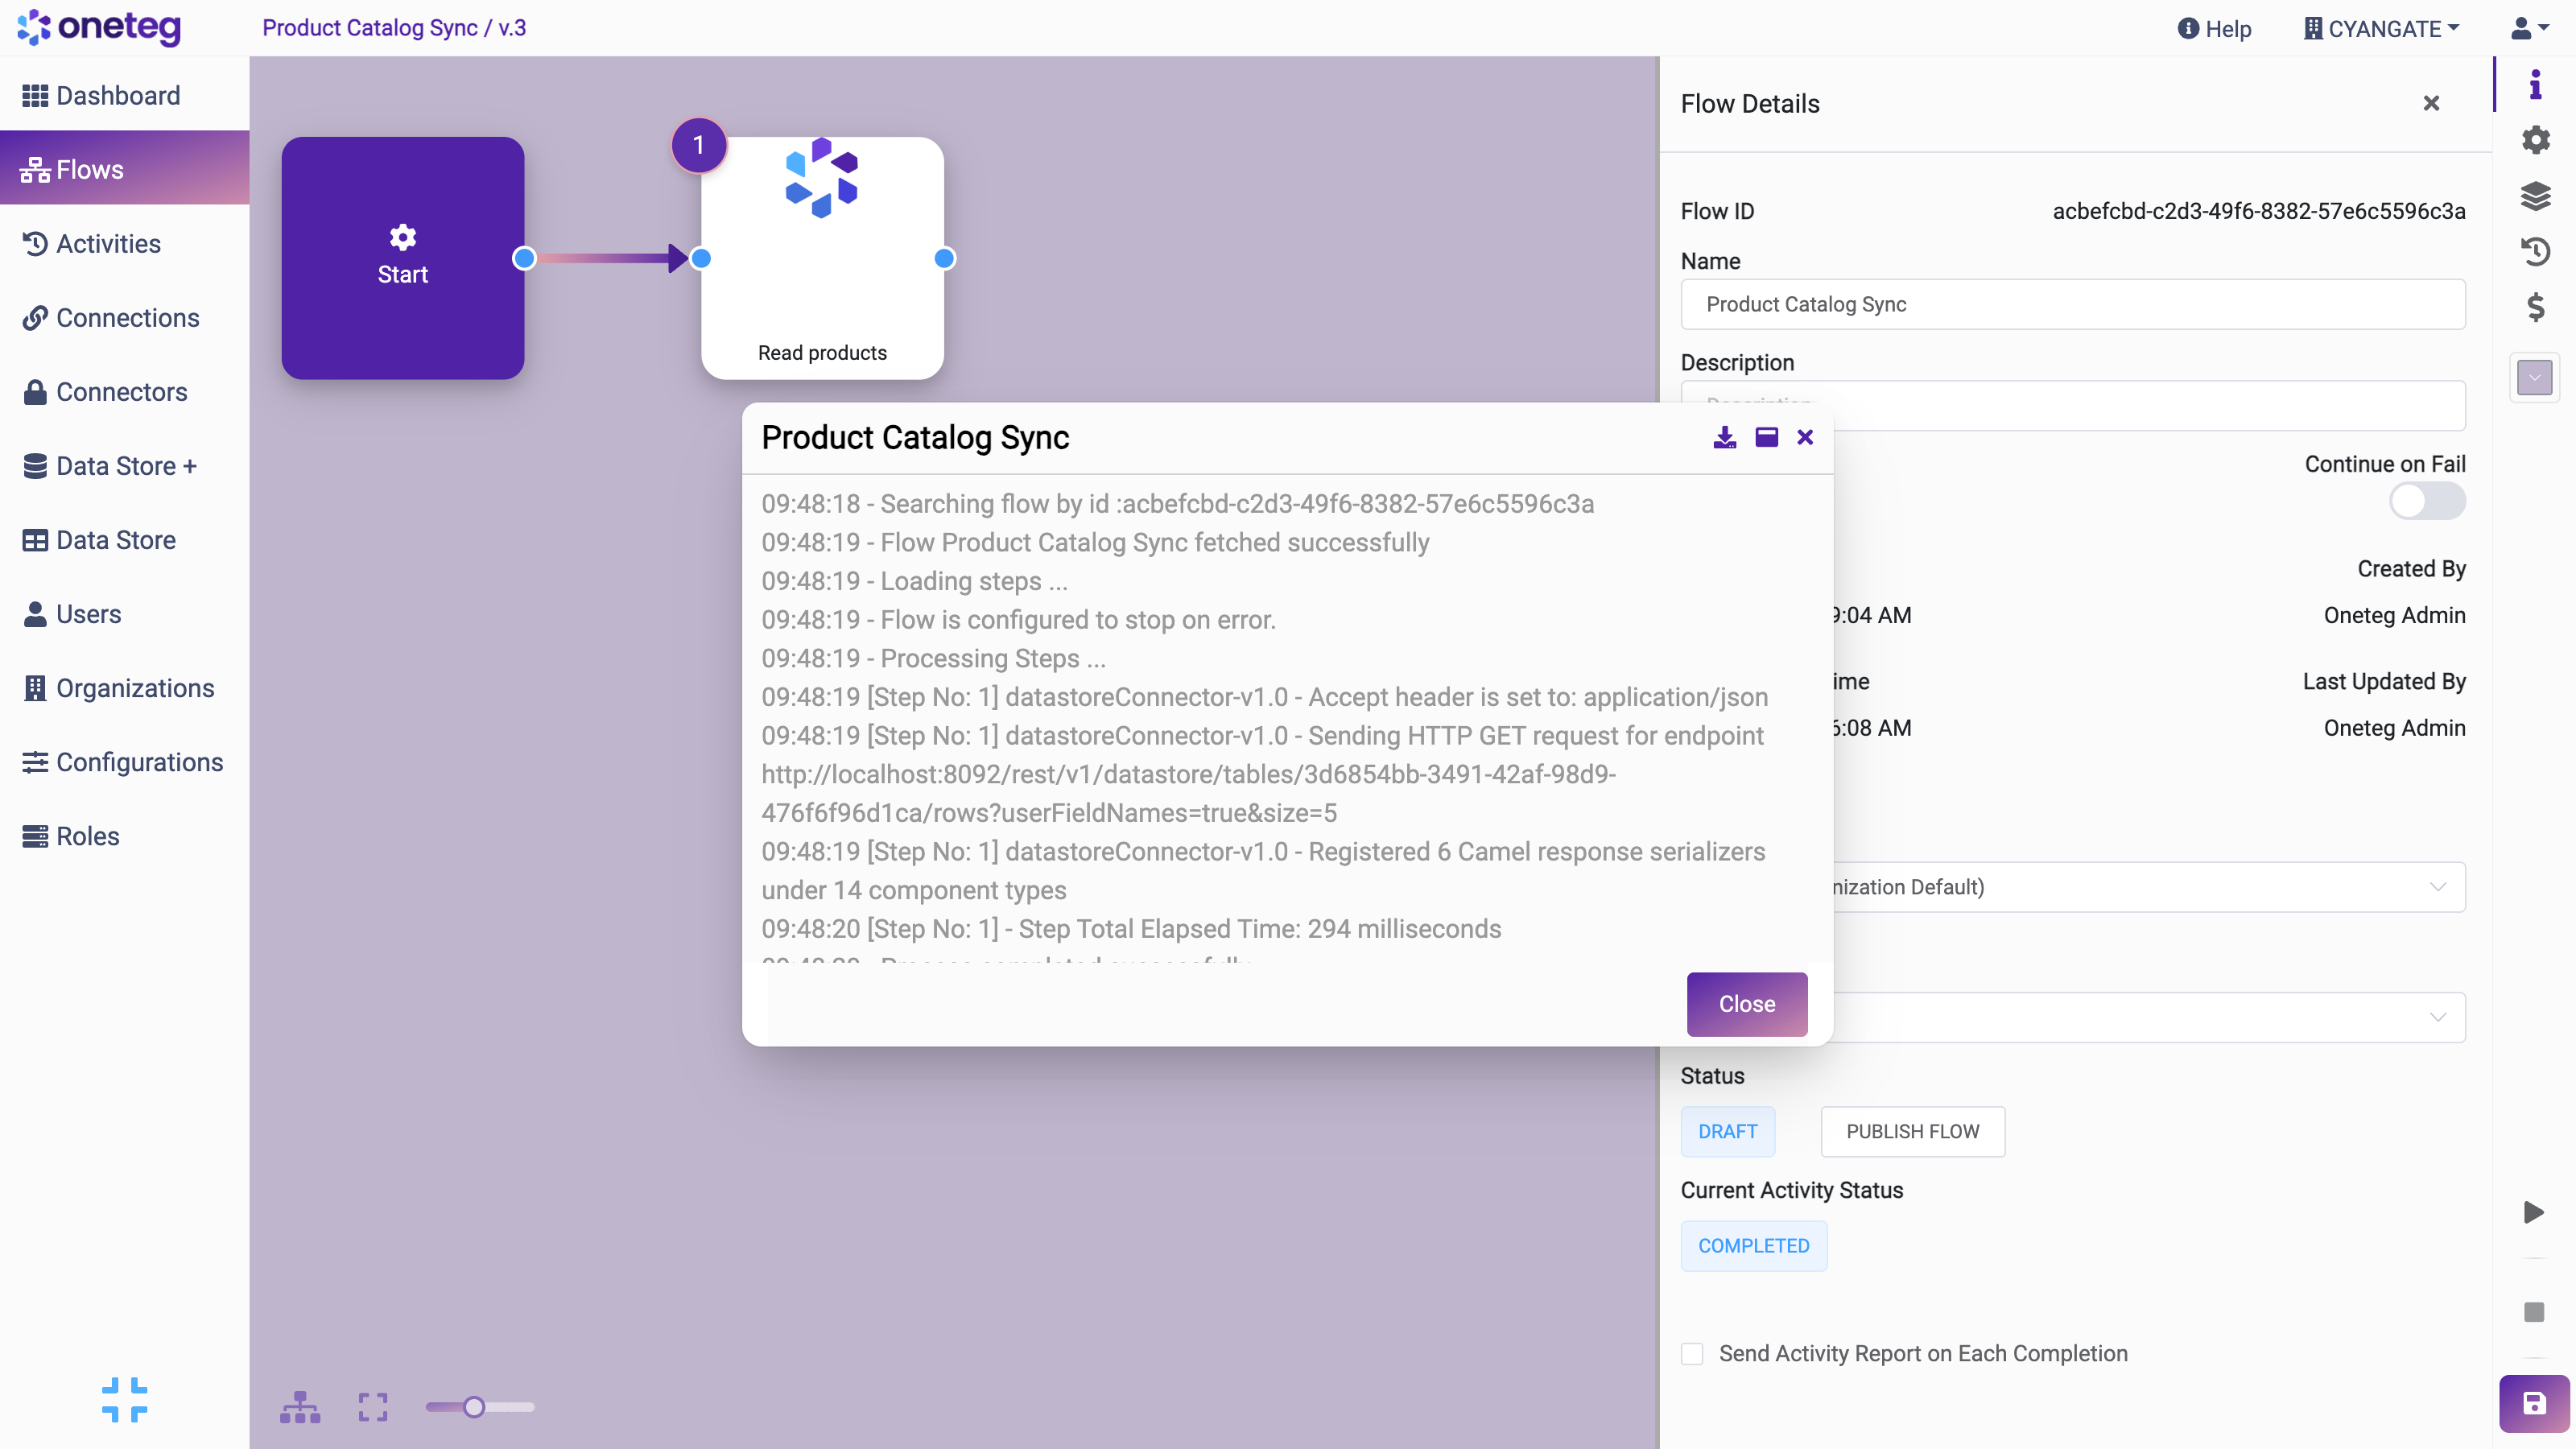
A successful run. The log names the exact request the step made, and the status at the bottom right reads COMPLETED.
The log is the first place to look when a step misbehaves — it shows the request the step actually sent, which usually makes a wrong table id or a missing setting obvious at a glance.
8.12 What a flow step is and is not allowed to do
Two rules, and they explain nearly every unexpected refusal:
-
A step acts as the flow's organization. It reads and writes the same tables that organization can reach in the browser, and nothing else. A table belonging to another organization that has not been shared with yours does not merely refuse the step — it reports as not found, because the step is not entitled to learn that it exists.
-
A shared table's level still applies. If another organization shared a table with yours at Read, a flow step of yours can read it and cannot write to it, exactly as a person could not.
One thing a flow can never do, whatever permissions its author holds, is share a table with another organization. Sharing is always a deliberate human act.
A scheduled or webhook-triggered flow has no logged-in user behind it, so Data Store steps in unattended flows are not blocked by any individual's permissions. The organization and sharing rules above still apply in full.
9. Limits you should know about
Your tenant has limits so that one table cannot crowd out everyone else. The values below are the defaults; your administrator may have set different ones, and the Usage gauge in Table details (Section 5.8) always shows the ones actually in force for you.
|
Limit |
Default |
What happens at the limit |
|---|---|---|
|
Tables per organization |
50 |
Creating another is refused. |
|
Fields per table |
100 |
Adding another is refused. |
|
Rows per table |
5,000,000 |
New rows are refused until rows are deleted. OneTeg warns you on the table page as you approach it. |
|
Rows across all your tables |
10,000,000 |
As above, counted across the organization. |
|
Size of one cell |
4,000 bytes |
The value is refused. Keep genuinely long text in a LONG_TEXT field and keep it reasonable. |
|
Rows per page when reading |
200 |
A larger request is trimmed to 200 rather than refused. |
|
Rows per batch write |
200 |
A larger batch is refused, so split it. |
|
Page-number paging depth |
100,000 rows |
Refused, with a message telling you to page with a cursor instead (Section 8.6). |
|
Import file size |
2 GB |
The upload is refused. |
If a table is genuinely outgrowing the row ceiling, that is the point at which Data Store + is worth a conversation with your administrator — it removes the ceiling.
10. Trash and getting things back
Deleting a table or a field is reversible. Deleting a row is not.
|
You deleted… |
What actually happened |
Getting it back |
|---|---|---|
|
A table |
It moved to the trash and left the table list. Its data is intact. |
Restore it during the retention window (15 days by default). |
|
A field |
Same: gone from the table, data intact underneath. |
Recoverable during the same window — ask your administrator. |
|
Rows |
They are gone, and the space they used is freed immediately. |
Only from a CSV export you took beforehand. |
A habit worth having. Export the table (Section 6.2) before any bulk row delete, any large import in "Append every row" mode, or any field type change whose dry run reports failures. It takes seconds and it is the only undo that covers rows.
11. When something goes wrong
OneTeg's Data Store messages are written to be read. Here is what the common ones mean.
|
What you see |
What it means |
What to do |
|---|---|---|
|
You do not have permission to… |
Your role is missing one of the nine Data Store permissions. |
Ask your administrator (Section 12). |
|
Not found, for a table you are sure exists |
The table belongs to another organization and has not been shared with yours — or it is in the trash. |
Check you are in the right organization; ask the owner to share it. |
|
Access denied |
You can see the table but not do this to it — typically a write against a table shared with you at Read only. |
Ask the owning organization for Read and write. |
|
Validation failed, naming a field and a value |
The value does not fit the field's type. The message says which and why, for example "Launch Date: 'not-a-date' is not a date in YYYY-MM-DD format." |
Fix the value, or change the field's type (Section 5.6). |
|
An Upsert rows step refused before writing anything — "Field 'Name' must be marked unique…", "No field 'X' on this table; keyFieldId takes a field id or a field name", or "Every upserted row needs a value for the key field 'SKU'" |
The step's key field is wrong, or a row in the batch has no value for it. Nothing was written — upsert validates the whole batch first. |
Mark the key field unique (Section 5.3), correct the field name, or make sure every row you send carries the key value. |
|
Name conflict — "A table called 'X' already exists in this organization" or "A field called 'X' already exists on this table" |
Two tables in your organization, or two fields in one table, would end up with the same name. |
Pick another name. Note that a trashed table frees its name. |
|
"Another row already has 'SKU-01005' in 'SKU', which must be unique" |
You tried to write a value that another row already holds in a field marked as a unique key. |
Use Upsert rows instead of Insert row where the record may already exist (Section 8.8) — it updates the existing row rather than colliding with it. In the browser, find the existing row and edit it. |
|
Limit exceeded |
A limit from Section 9 was reached. The message names which one. |
Delete what you no longer need, or talk to your administrator. |
|
That page is past the offset cap |
You paged too deep with page numbers. |
Page with cursors instead (Section 8.6). |
|
The table is busy |
An import, type change or copy is already running on this table. |
Wait for it to finish, then retry. |
|
Too many jobs |
Your tenant is running as many background jobs as it can at once. |
Retry in a few minutes. |
|
Sharing is disabled |
Table sharing is switched off for the whole tenant. |
Ask your administrator to enable it. Revoking existing access keeps working either way. |
|
"The Data Store could not complete this request; the service log has the database error" |
Something failed in the database that is not one of the cases above. The detail is deliberately kept out of the message. |
Note the time and what you were doing, and send it to your OneTeg administrator — the full error is in the service log. |
Things that are not errors, though they look like one
-
A Lookup row step that returns nothing. That is the answer "no such record". Branch on it.
-
A slow-search warning on a big table. The result is still correct. Add a database index to the field you are searching (Section 5.3).
-
An import that reports fewer rows than your file had. If you chose "Keep the rows that validate", the report lists what was skipped and why.
12. For administrators: the nine permissions
The Data Store has nine permissions, all of which can be given to any role. Go to Roles, open a role, and expand the DataStore group.
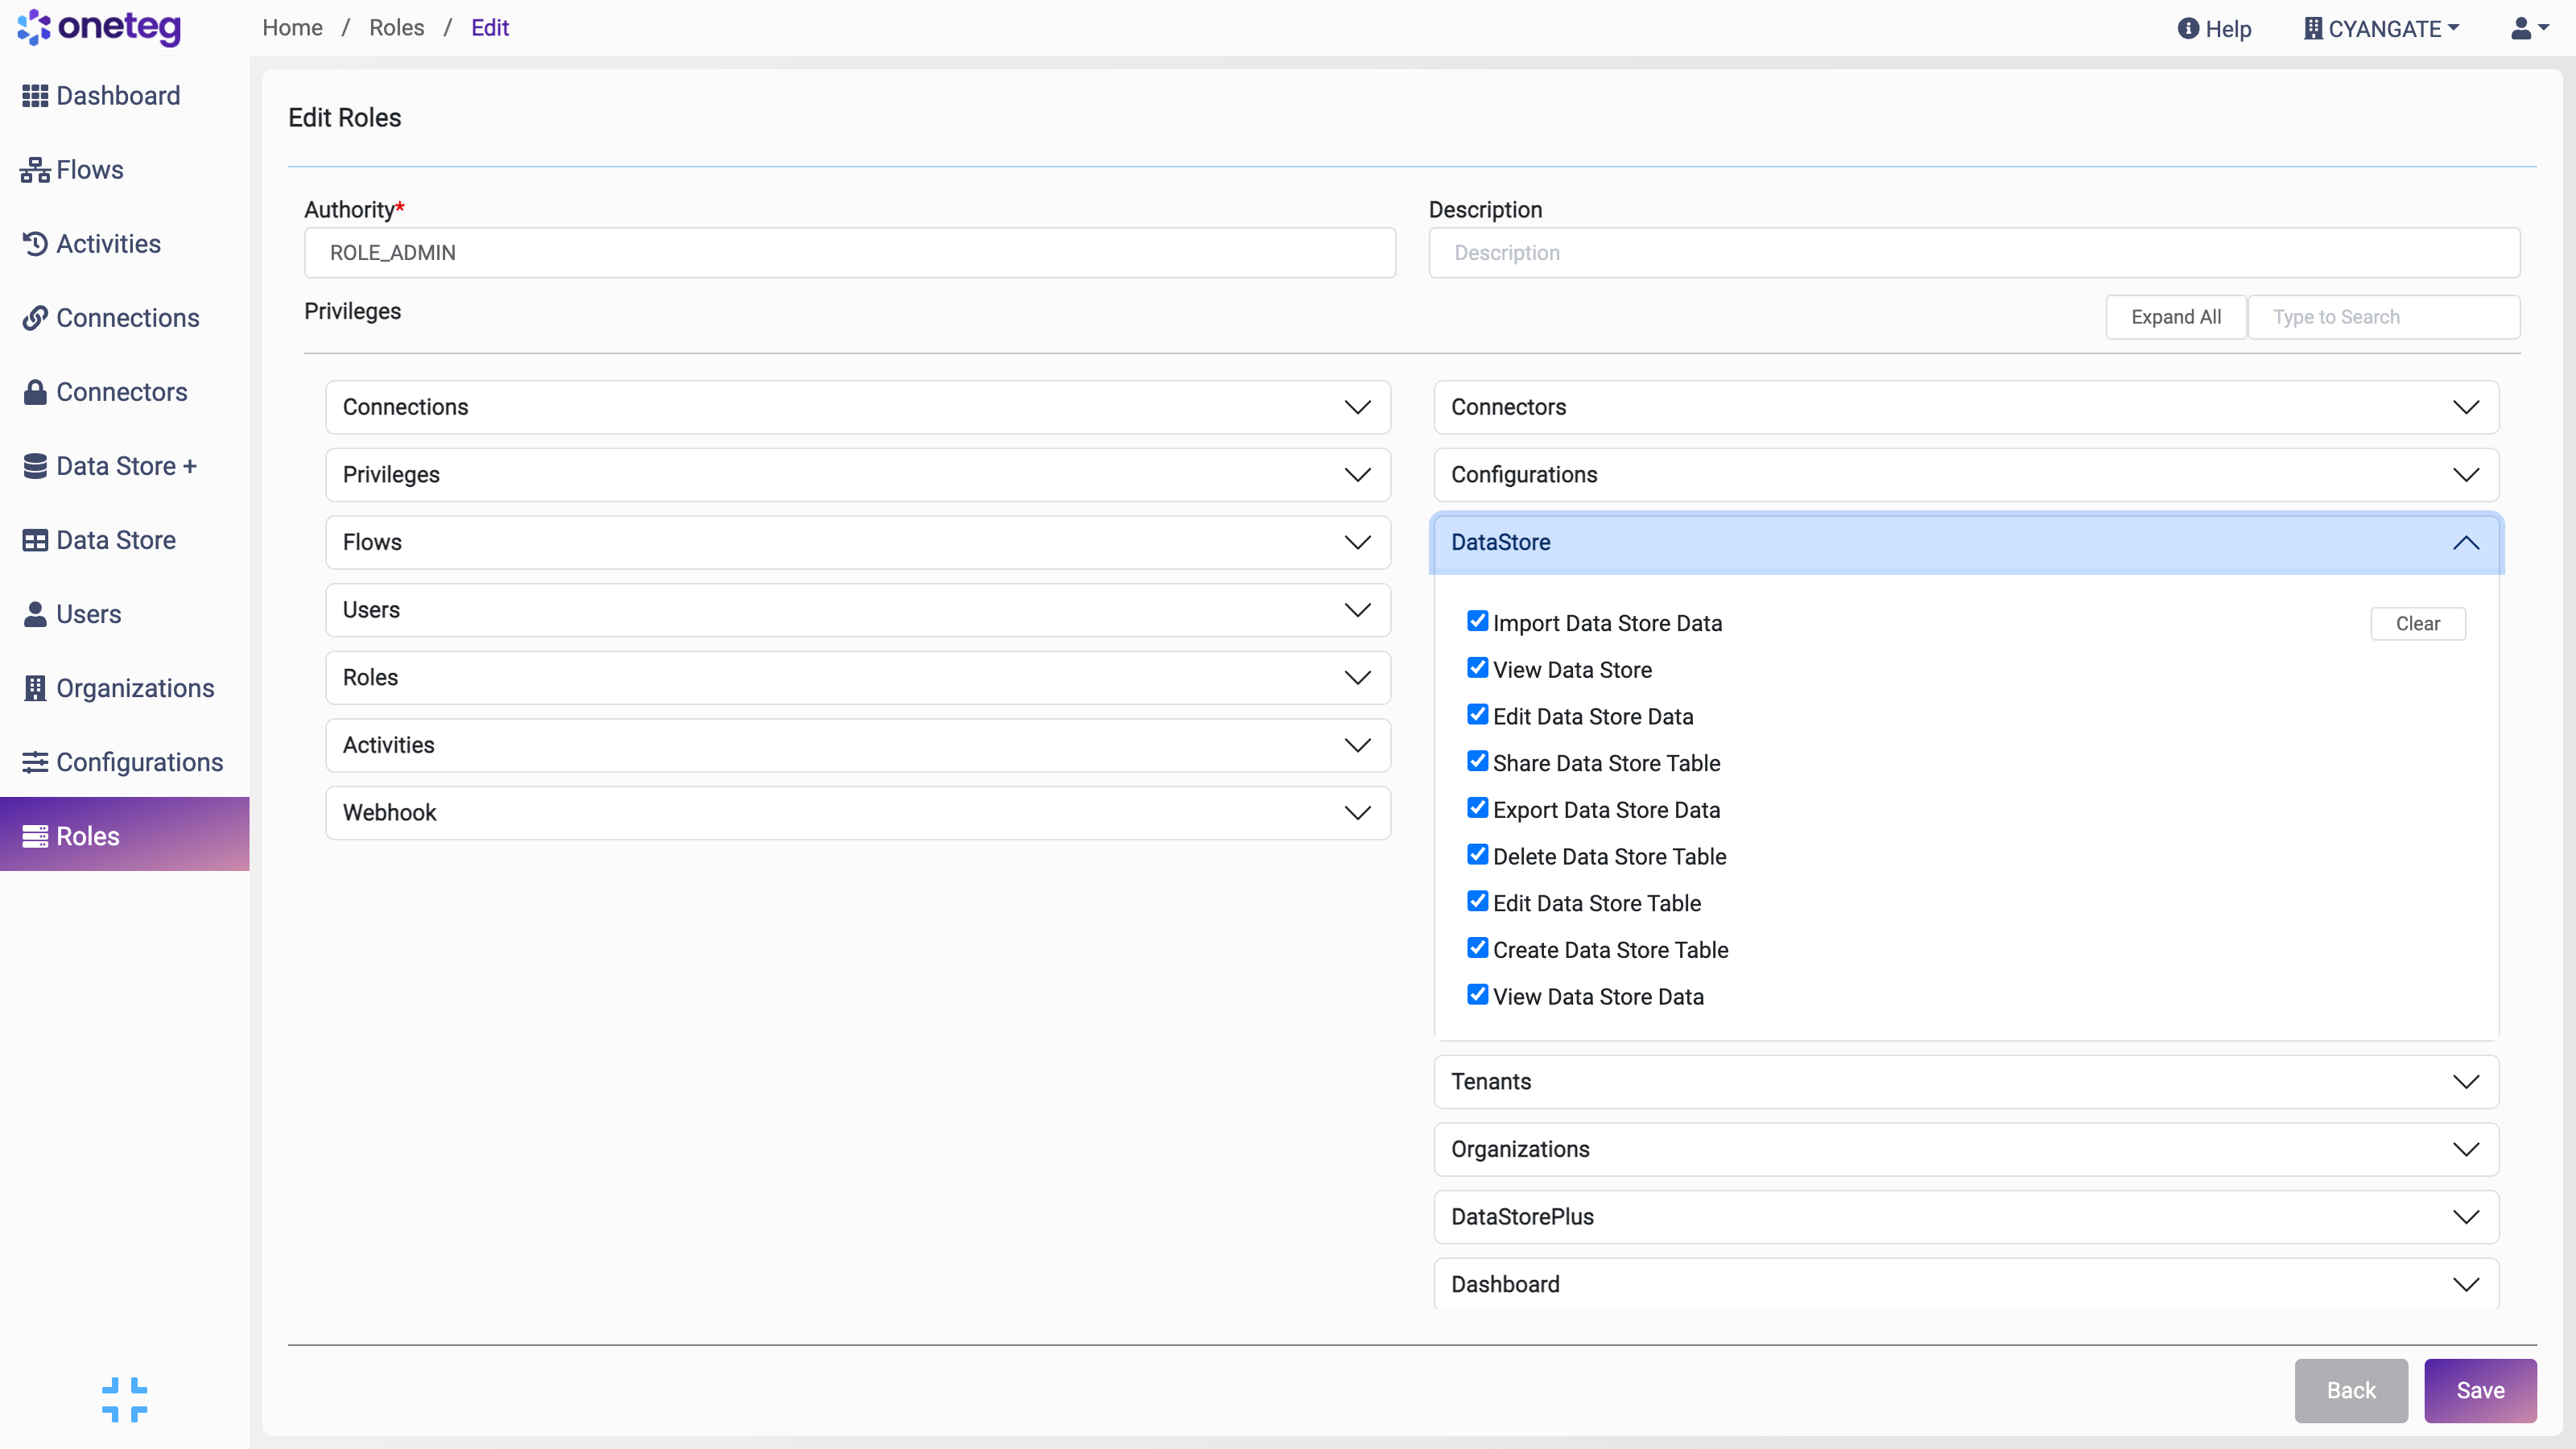
The DataStore group in the role editor, with all nine permissions granted.
|
Permission |
Lets the role… |
|---|---|
|
View Data Store |
See the menu item and open the pages; list tables, fields and shares; see job progress and the tenant's limits. Everything else needs this as well. |
|
View Data Store Data |
Read rows and row counts. |
|
Edit Data Store Data |
Create, change, delete and upsert rows. |
|
Create Data Store Table |
Create tables, including create-and-import, and duplicate an existing table. |
|
Edit Data Store Table |
Rename a table; add, edit, retype, reorder and delete its fields. |
|
Delete Data Store Table |
Move a table to the trash and restore it. |
|
Import Data Store Data |
Run CSV imports. Grant with Edit Data Store Data. |
|
Export Data Store Data |
Run CSV exports and download them. Grant with View Data Store Data. |
|
Share Data Store Table |
Give another organization access to a table, and take it away. |
What is granted out of the box
|
Role |
Gets |
|---|---|
|
ROLE_ADMIN |
All nine. |
|
ROLE_USER, ROLE_STAFF |
The read-only set: View Data Store, View Data Store Data, Export Data Store Data. Enough to use and download a table, not to reshape or delete one. |
Change it to suit your organization. A useful middle setting for a team that maintains reference data is the read-only set plus Edit Data Store Data and Import Data Store Data: they can keep the contents current but cannot change the shape of the table or delete it.
Two tenant-wide settings
-
Table sharing is off unless it is switched on for the tenant. While it is off, existing grants stay recorded but stop working, and can still be revoked; switching it back on restores exactly what was there. Set it from the Configurations page.
-
The limits in Section 9 are all tenant settings and can be tuned per tenant, and per organization within a tenant. Please contact your OneTeg Sales Representative to request these types of limit changes.