1. General Information
Plytix is a Product Information Management (PIM) platform designed for small and medium-sized businesses. It provides a centralized hub for managing product data, digital assets, and product relationships, enabling teams to create, enrich, and distribute accurate product content across sales channels, marketplaces, and e-commerce platforms.
The OneTeg Plytix Connector integrates with the Plytix PIM API and enables users to build automated workflows for managing products, attributes, assets, and channel data directly from the OneTeg flow builder.
2. Connect Plytix to OneTeg
The Plytix Connector supports two authentication methods — Custom (API Key + Password) and Bearer Token. The Custom method is recommended for most integrations as it authenticates automatically using your Plytix API credentials. Follow the steps below to obtain your API Key and API Password.
Step 1 - Locate Your API Key and API Password in Plytix
Log in to the Plytix platform at accounts.plytix.com. Click your profile icon in the bottom left corner and navigate to Settings→ API tab. You will see a table listing your API Keys with the following columns: API Key, API Password, Name, Created, and Assigned Role.
Copy the API Key and API Password values from your integration entry. If no API key exists, click the + button to generate a new one. Enter a name and assign the appropriate role.
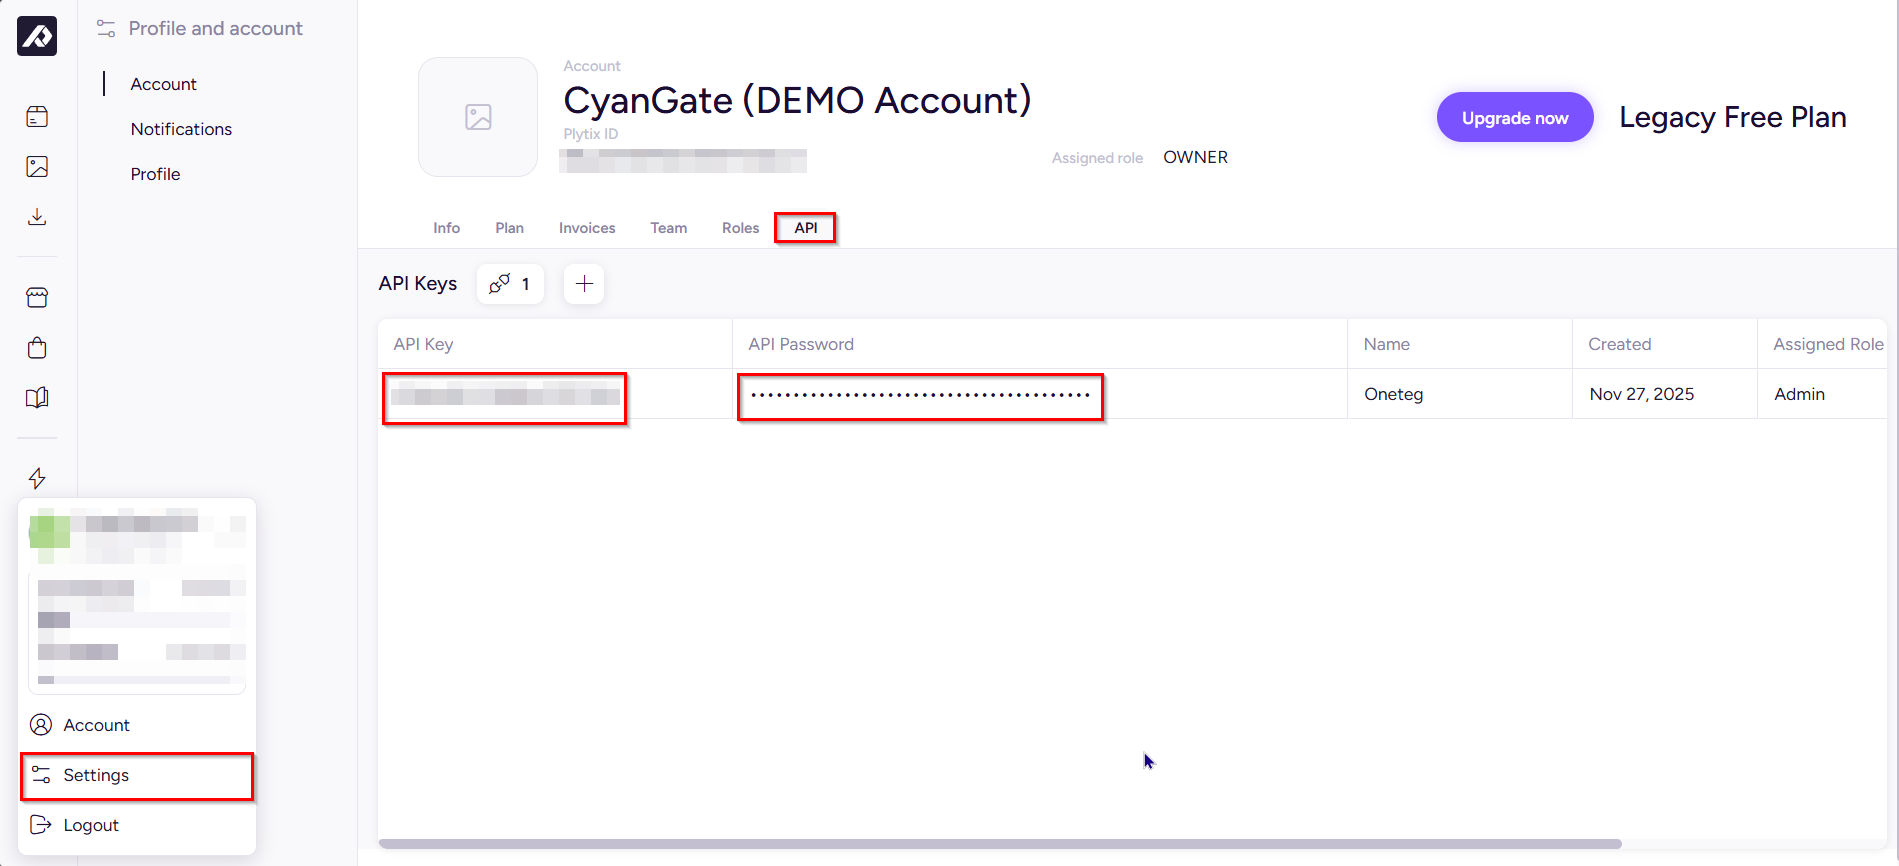
The API Password is masked by default in the Plytix interface. Make sure to copy it immediately when creating a new API key, or reveal it from the existing entry before configuring the OneTeg connection.
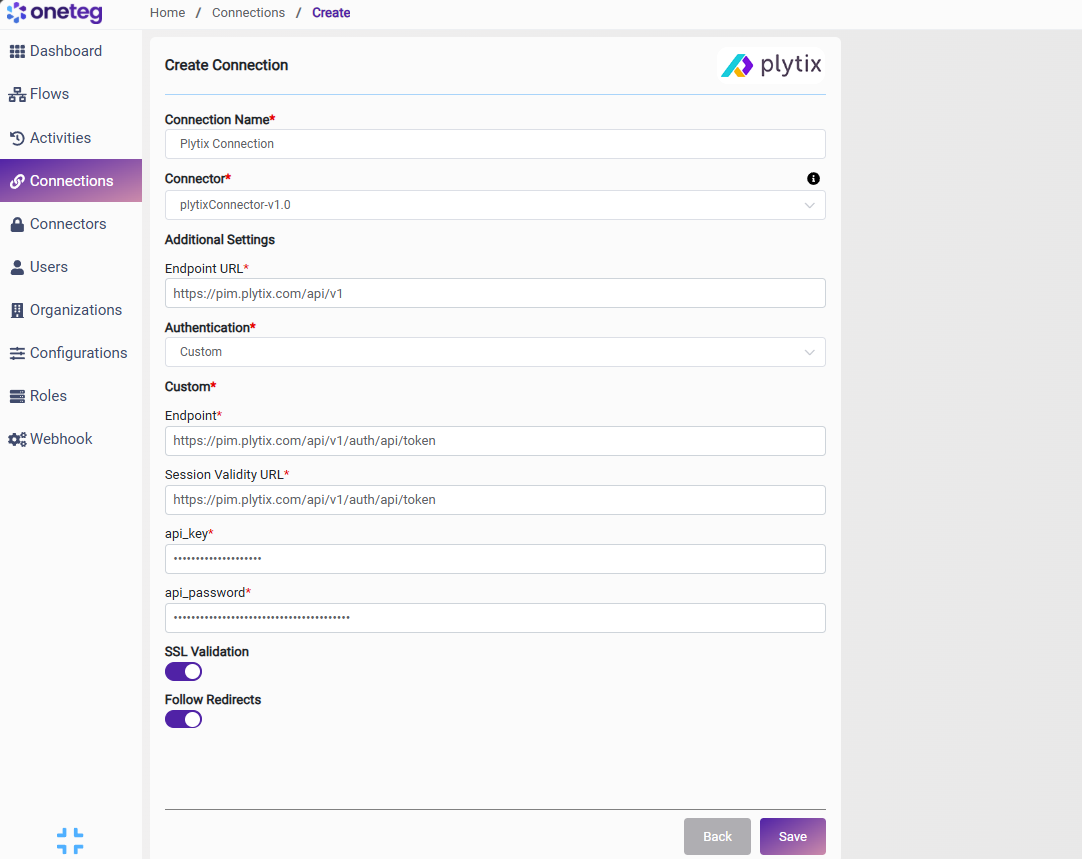
3. Connection Settings and Configuration for OneTeg
In OneTeg, navigate to Connections and create a new connection using the Plytix Connector. The connector supports two authentication methods — Custom and Bearer Token. Choose the one that best fits your setup.
Option 1 - Custom Authentication
OneTeg authenticates against the Plytix API using your API Key and API Password and automatically manages the session lifecycle.
|
Settings Parameters |
Value / Sample Value |
Description |
Required (Y/N) |
|
Connection Name |
Plytix Connection |
Choose a name for your Connection |
Y |
|
Connector |
plytixConnector-v1.0 |
Auto-populated once the Plytix Connector is selected |
Y |
|
Endpoint URL |
Base URL of the Plytix PIM API. This value is fixed and does not change |
Y |
|
|
Authentication |
Custom |
Select Custom from the dropdown |
Y |
|
Endpoint |
The Plytix authentication endpoint. OneTeg submits credentials here to obtain a session token. This value is fixed and does not change |
Y |
|
|
Session Validity URL |
The Plytix session validation endpoint. OneTeg calls this URL to verify the active session. This value is fixed and does not change |
Y |
|
|
api_key |
Plytix API Key |
Obtained from Plytix: profile icon → Settings → API tab → API Key column |
Y |
|
api_password |
Plytix API Password |
Obtained from Plytix: profile icon → Settings API tab → API Password column. |
Y |
Option 2 - Bearer Token Authentication
Use this method if you have a pre-existing Plytix access token obtained externally. Plytix access tokens are time-limited — you will need to manually update the token when it expires, making this method less suitable for long-running automations.
|
Settings Parameters |
Value / Sample Value |
Description |
Required (Y/N) |
|
Connection Name |
Plytix Connection |
Choose a name for your Connection |
Y |
|
Connector |
plytixConnector-v1.0 |
Auto-populated once the Plytix Connector is selected |
Y |
|
Endpoint URL |
Base URL of the Plytix PIM API. This value is fixed and does not change |
Y |
|
|
Authentication |
Bearer |
Select Bearer from the dropdown |
Y |
|
Token |
Plytix access token |
A valid Plytix access token obtained by calling the authentication endpoint manually. Must be updated when it expires |
Y |
4. Supported Plytix Actions and Options
For the full list of supported endpoints, parameters, and options, see the page below: