
1. General Information
ServiceNow is a cloud-based platform for digital workflows, widely used for IT service management (ITSM), IT operations, HR, customer service, and other enterprise processes. Its data is organized into tables (such as incidents, tasks, and users). The ServiceNow REST API — including the Table API — provides programmatic access to records across these tables.
The OneTeg ServiceNow Connector integrates with the ServiceNow REST API, enabling users to work with ServiceNow records directly from OneTeg automation workflows. This connector authenticates using OAuth 2.0 with the Authorization Code flow.
ServiceNow’s OAuth endpoints and REST API base are instance-specific — they all use your https://{your-instance}.service-now.com host. After a one-time browser login, OneTeg receives an access token (valid for about 30 minutes) together with a refresh token, which is used to renew access automatically without repeated logins.
2. Connect ServiceNow to OneTeg
The OAuth flow uses an OAuth application registered in ServiceNow. Follow the steps below to register the application and identify the URLs you will enter into OneTeg.
Step 1 - Register an OAuth Application
In ServiceNow, go to System OAuth → Application Registry and click New, then select “Create an OAuth API endpoint for external clients”. Enter a Name, set the Redirect URL to the OneTeg OAuth callback URL (https://app.oneteg.com/rest/v1/oauth2/callback), add an Auth Scope, and save.
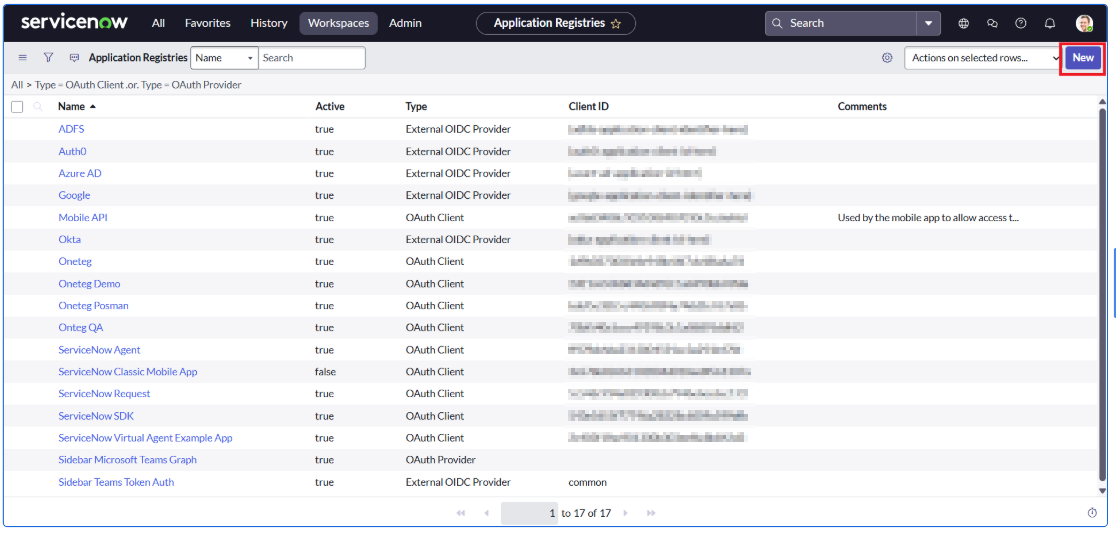

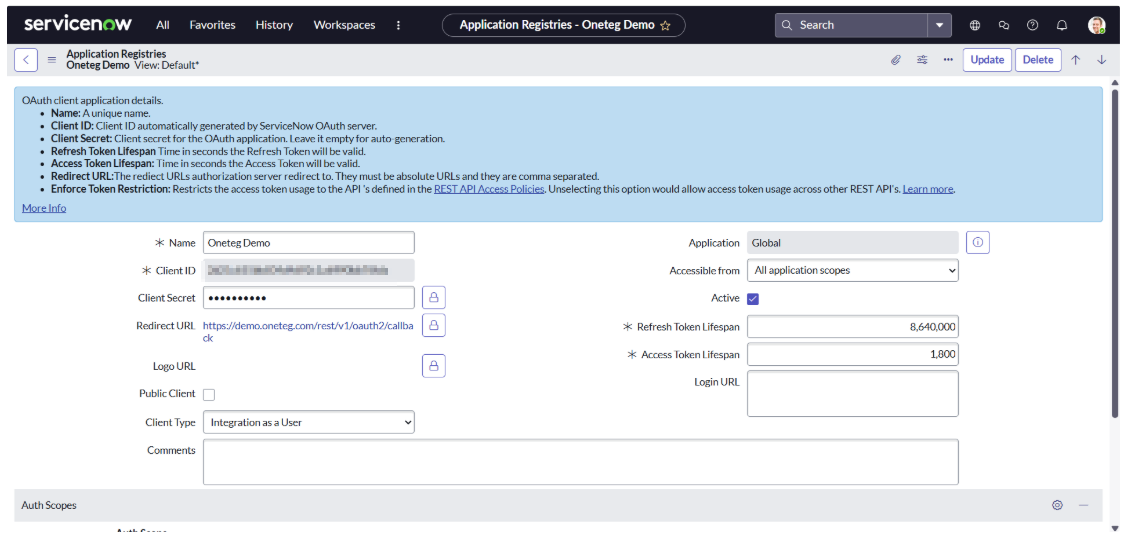
Step 2 - Copy the Client ID and Client Secret
Open the application registry record and copy the Client ID and Client Secret. The Client Secret may be hidden behind a lock icon — click it to reveal the value.
Keep the Client Secret secure and store it like a password.
Step 3 - Identify Your Instance URLs
All URLs are instance-specific. Your API Endpoint URL is https://{your-instance}.service-now.com/api/now, your Token URL is https://{your-instance}.service-now.com/oauth_token.do, and your Authorization URL is https://{your-instance}.service-now.com/oauth_auth.do. Replace {your-instance} with your ServiceNow instance name.
3. Connection Settings and Configuration for OneTeg
In OneTeg, navigate to Connections and create a new connection using the ServiceNow Connector. Enter the settings below.
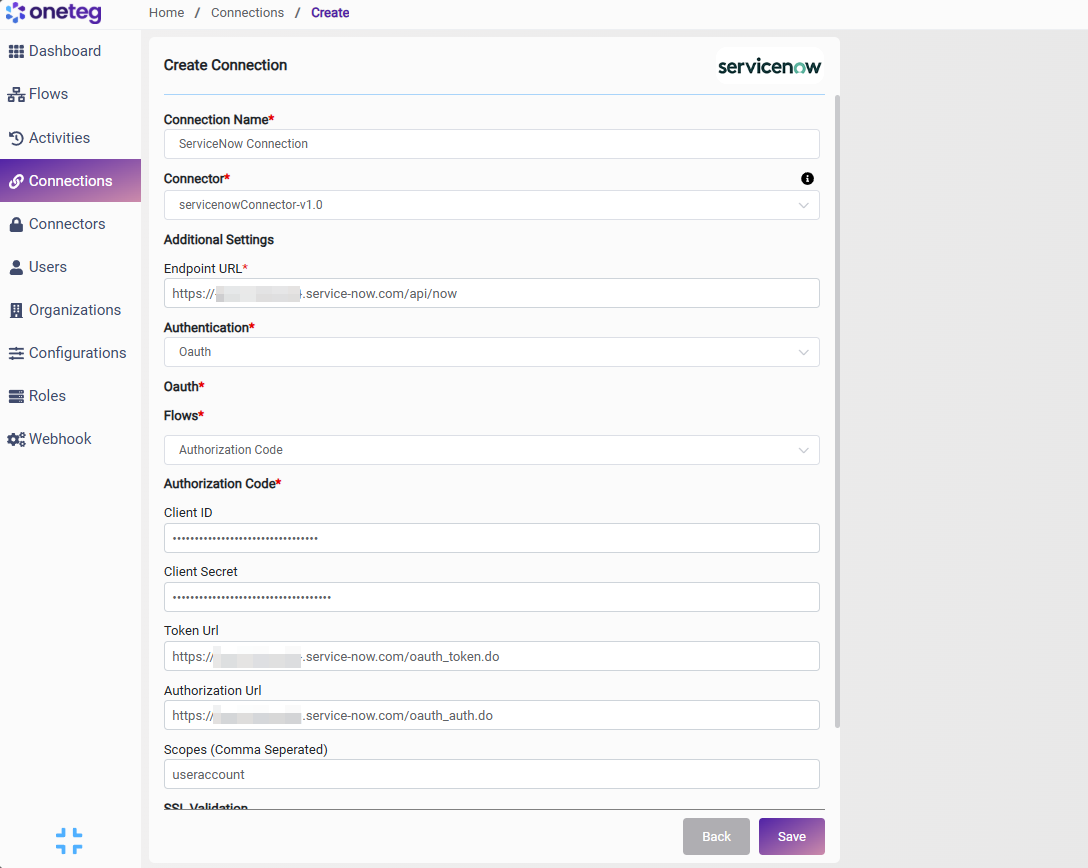
|
Settings Parameters |
Value / Sample Value |
Description |
Required (Y/N) |
|
Connection Name |
ServiceNow Connection |
Choose a name for your Connection |
Y |
|
Connector |
servicenowConnector-v1.0 |
Auto-populated once the ServiceNow Connector is selected |
Y |
|
Endpoint URL |
https://{your-instance}.service-now.com/api/now |
The base URL of the ServiceNow REST API, where {your-instance} is your ServiceNow instance |
Y |
|
Authentication |
Oauth |
Select Oauth as the authentication method |
Y |
|
Flows |
Authorization Code |
Select Authorization Code as the OAuth flow |
Y |
|
Client ID |
Your ServiceNow Client ID |
The Client ID from your ServiceNow OAuth application (System OAuth → Application Registry) |
Y |
|
Client Secret |
Your ServiceNow Client Secret |
The Client Secret from your ServiceNow OAuth application |
Y |
|
Token Url |
https://{your-instance}.service-now.com/oauth_token.do |
The ServiceNow token endpoint for your instance |
Y |
|
Authorization Url |
https://{your-instance}.service-now.com/oauth_auth.do |
The ServiceNow authorization endpoint for your instance |
Y |
|
Scopes |
useraccount |
Optional. The OAuth scope to request; ServiceNow’s default scope is useraccount |
N |
4. Supported ServiceNow Actions and Options
For the full list of supported endpoints, parameters, and options, see the page below: