1. General Information
OpenText Media Management (OTMM) is an enterprise Digital Asset Management (DAM) platform that enables organizations to centrally manage, organize, and distribute digital media assets — including images, videos, audio, and documents — across teams and channels. It provides advanced workflow automation, metadata management, rights tracking, and multi-channel distribution capabilities, making it a widely adopted DAM solution for large enterprises.
The OneTeg OpenText Media Management Connector integrates with the OTMM REST API v6 and enables users to build automated workflows for managing assets, metadata, collections, and user sessions directly from the OneTeg flow builder.
OpenText Media Management can be deployed on-premise or in the cloud. The Endpoint URL, authentication Endpoint, and Session Validity URL are specific to your OTMM deployment. Replace the placeholder values in this document with your actual OTMM server URL.
2. Connect OpenText Media Management to OneTeg
The OpenText Media Management Connector uses a custom session-based authentication method. OneTeg submits your OTMM username and password to the sessions endpoint to create an authenticated session, and manages the session lifecycle automatically using the Session Validity URL. No OAuth app registration is required.
The user account used for the connector should be a dedicated integration user in OTMM with the minimum required permissions for the actions your flows will perform. Avoid using personal administrator accounts to maintain a clean audit trail.
Step 1 - Identify Your OTMM Server URL and Create an Integration User
Log in to your OpenText Media Management instance and note the base URL from your browser's address bar — it follows the pattern https://your-otmm-instance.com/otmmapi. This is the value you will use as the Endpoint URL in OneTeg.
If a dedicated integration user does not already exist, ask your OTMM administrator to create one under Administration → Users and assign it the appropriate role with the minimum permissions your OneTeg workflows require.
3. Connection Settings and Configuration for OneTeg
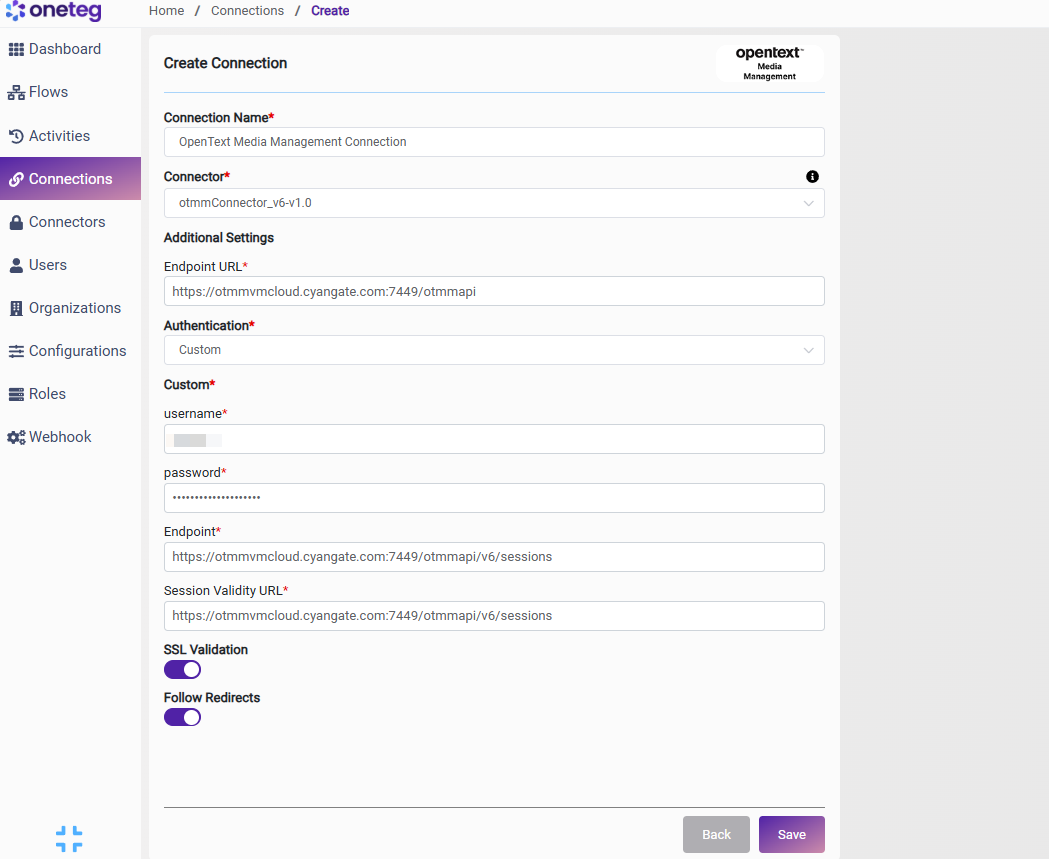
In OneTeg, navigate to Connections and create a new connection using the OpenText Media Management Connector. Fill in the settings below using your OTMM server URL and integration user credentials.
|
Settings Parameters |
Value / Sample Value |
Description |
Required (Y/N) |
|
Connection Name |
OpenText Media Management Connection |
Choose a name for your Connection |
Y |
|
Connector |
otmmConnector_v6-v1.0 |
Auto-populated once the OpenText Media Management Connector is selected |
Y |
|
Endpoint URL |
Base URL of your OTMM REST API. Replace your-otmm-instance.com with your actual OTMM server hostname. Found in your browser address bar when logged in to OTMM |
Y |
|
|
Authentication |
Custom |
Select Custom from the dropdown |
Y |
|
username |
The username of the dedicated OTMM integration user |
Y |
|
|
password |
OTMM user password |
The password of the OTMM integration user. Ensure the password is kept up to date to avoid connection failures |
Y |
|
Endpoint |
The OTMM session creation endpoint. OneTeg POSTs credentials here to create an authenticated session. Constructed by appending /v6/sessions to your Endpoint URL |
Y |
|
|
Session Validity URL |
The OTMM session validation endpoint. OneTeg calls this URL to verify and maintain the active session. Uses the same sessions endpoint as the authentication Endpoint |
Y |
4. Supported OpenText Media Management Actions and Options
For the full list of supported endpoints, parameters, and options, see the page below: