
1. General Information
Frameio is a cloud-based video review and collaboration platform used by creative teams to upload, review, and approve media assets. It centralizes feedback, version tracking, and approvals for video, image, and document content, streamlining post-production and creative workflows. Frameio exposes a REST API that provides programmatic access to accounts, projects, assets, comments, and review workflows.
The OneTeg Frameio Connector integrates with the Frameio REST API, enabling users to manage assets, projects, and collaboration workflows directly from OneTeg automation flows. This connector supports two authentication methods: OAuth Authorization Code for user-delegated access, and Bearer token using a Frameio Developer Token.
This connector targets the Frameio Legacy API (V2). Developer Tokens and OAuth apps are managed through the Frameio Developer Portal at developer.Frameio. Note that Frameio accounts migrated to the Adobe-managed V4 platform use a different authentication system (Adobe IMS) and are not covered by this connector.
2. Connect Frameio to OneTeg
The Frameio Connector supports two authentication methods, both managed through the Frameio Developer Portal. Steps 1–3 cover creating an OAuth app for the recommended OAuth Authorization Code method. Step 4 is optional and covers generating a Developer Token for the Bearer method.
Step 1 - Log in to the Frameio Developer Portal
Navigate to https://developer.frame.io and sign in using your Frameio email and password.
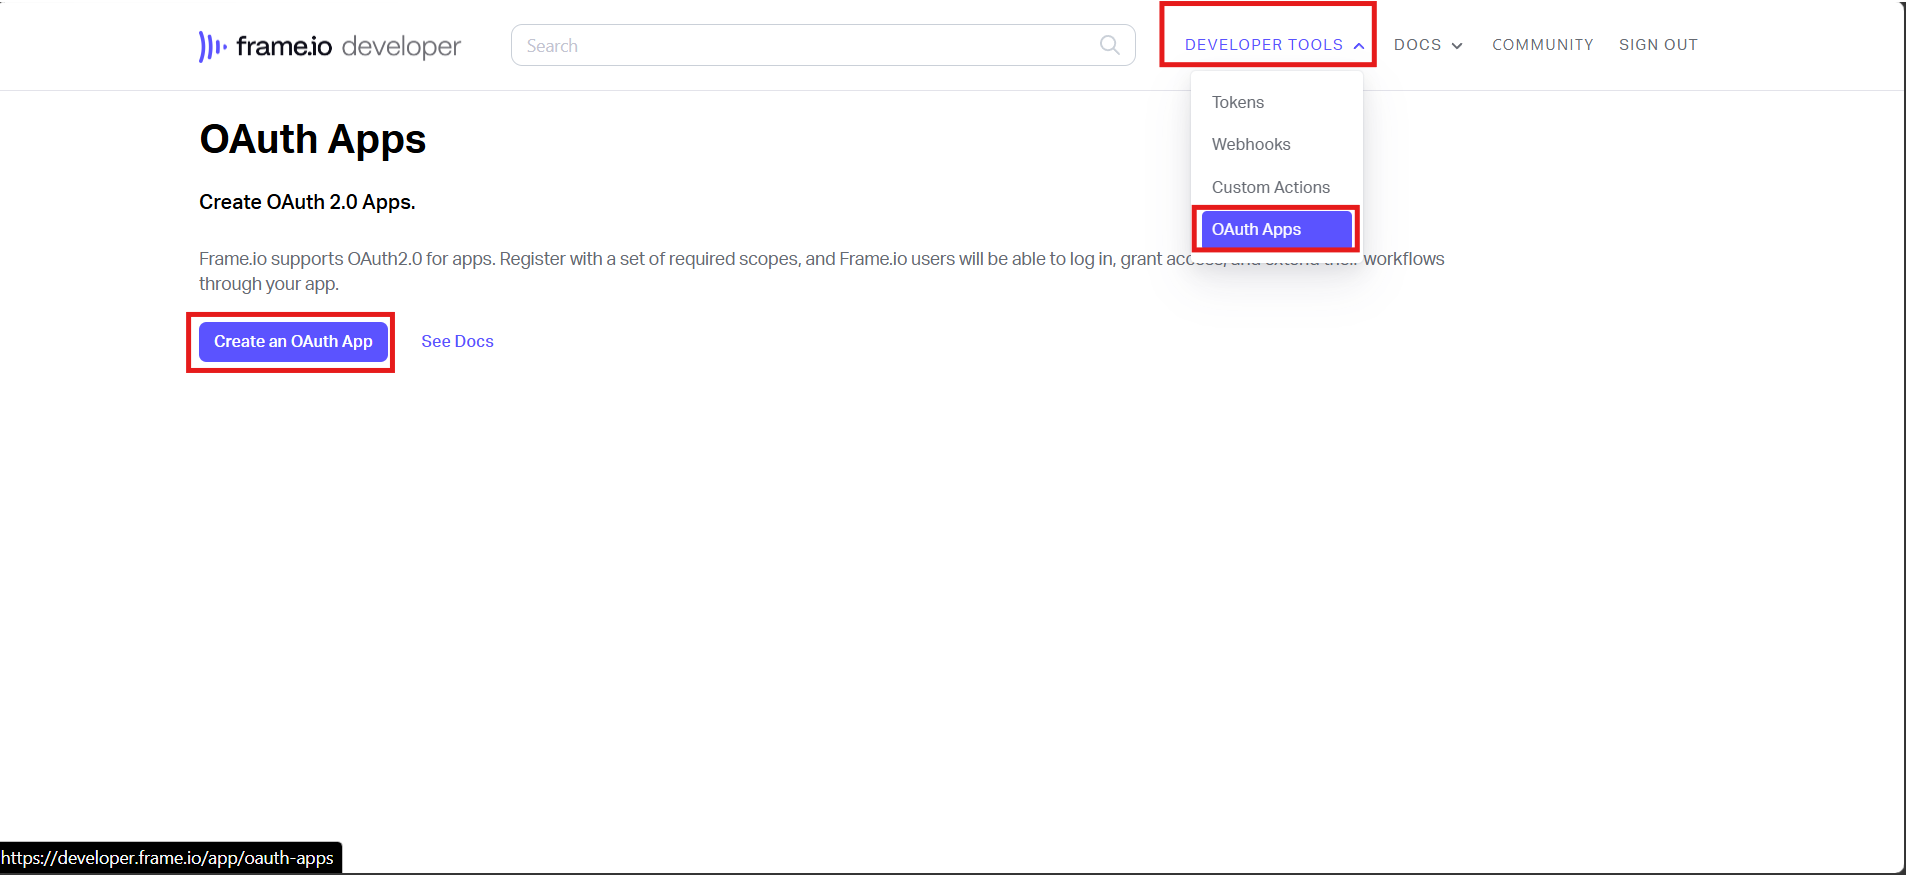
Step 2 - Create a New OAuth App
In the Developer Portal, navigate to OAuth Apps using the links on the left-hand side and click New to start setting up your app. Enter a Name and a Redirect URI, select your Scopes, and choose whether to use PKCE. Use the OneTeg OAuth callback URL as the Redirect URI:
https://app.oneteg.com/rest/v1/oauth2/callback
For typical asset access, select read scopes such as account.read and asset.read. Add the offline scope to enable refresh tokens, and include write scopes only if your workflow needs to modify data. Click Save.
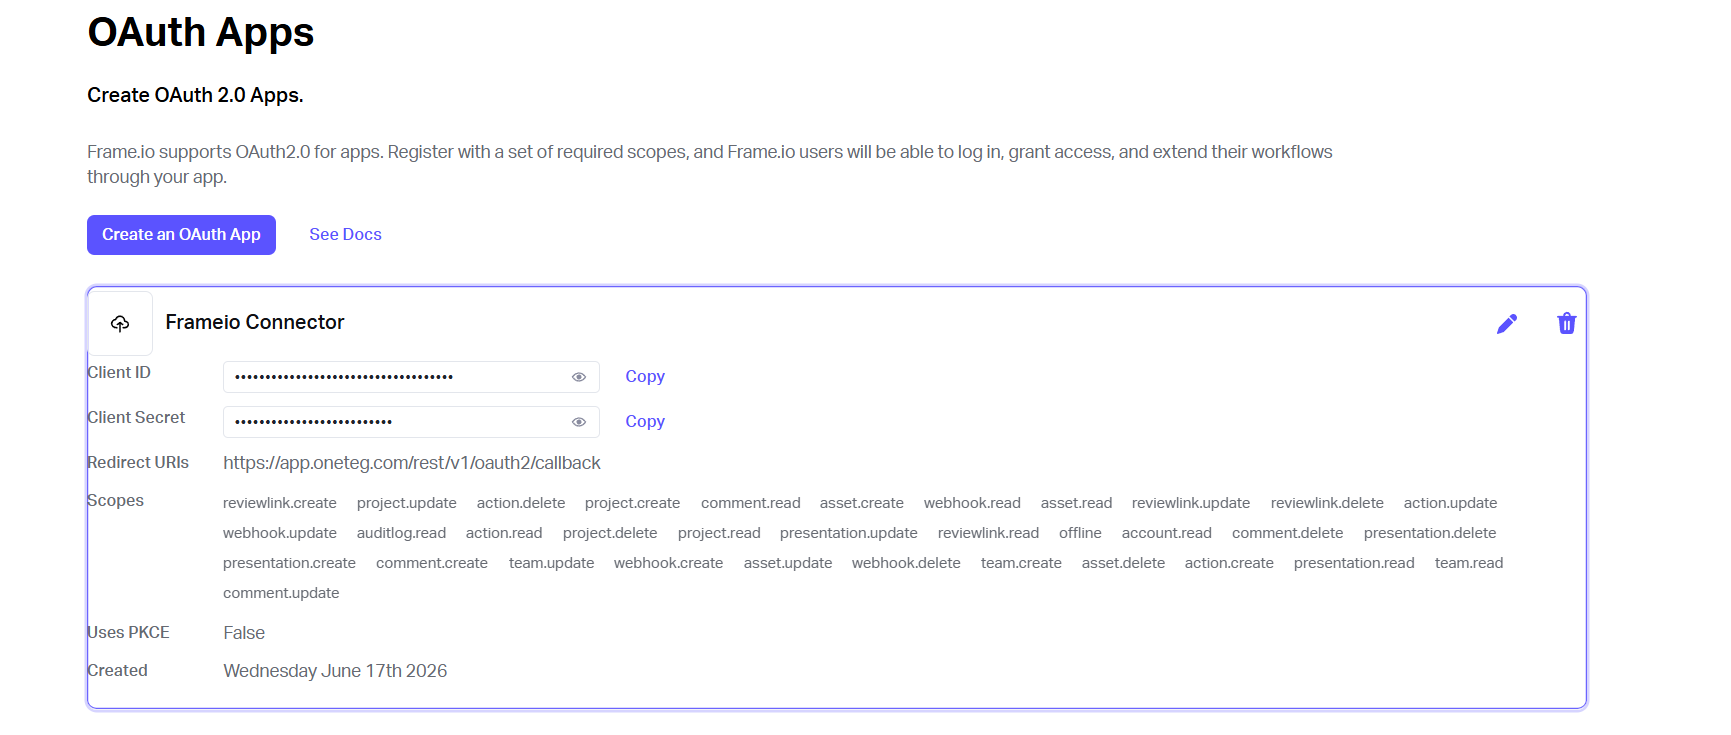
Step 3 - Copy the Client ID and Client Secret
After saving, your app configuration displays the Client ID and Client Secret. Copy both values — you will enter them into OneTeg in the next step.
If you enable PKCE for your app, no Client Secret is generated. In that case, leave the Client Secret field empty in OneTeg and ensure the PKCE flow is supported by your connection setup.
Step 4 (Optional) - Generate a Developer Token
If you prefer the Bearer authentication method, you can generate a Developer Token instead of creating an OAuth app. In the Frameio Developer Portal, navigate to the Tokens (or Developer Tokens) section and click New / Create. Select the scopes the token requires, then generate the token. Copy the token value immediately — this is what you will enter into the token field in OneTeg.
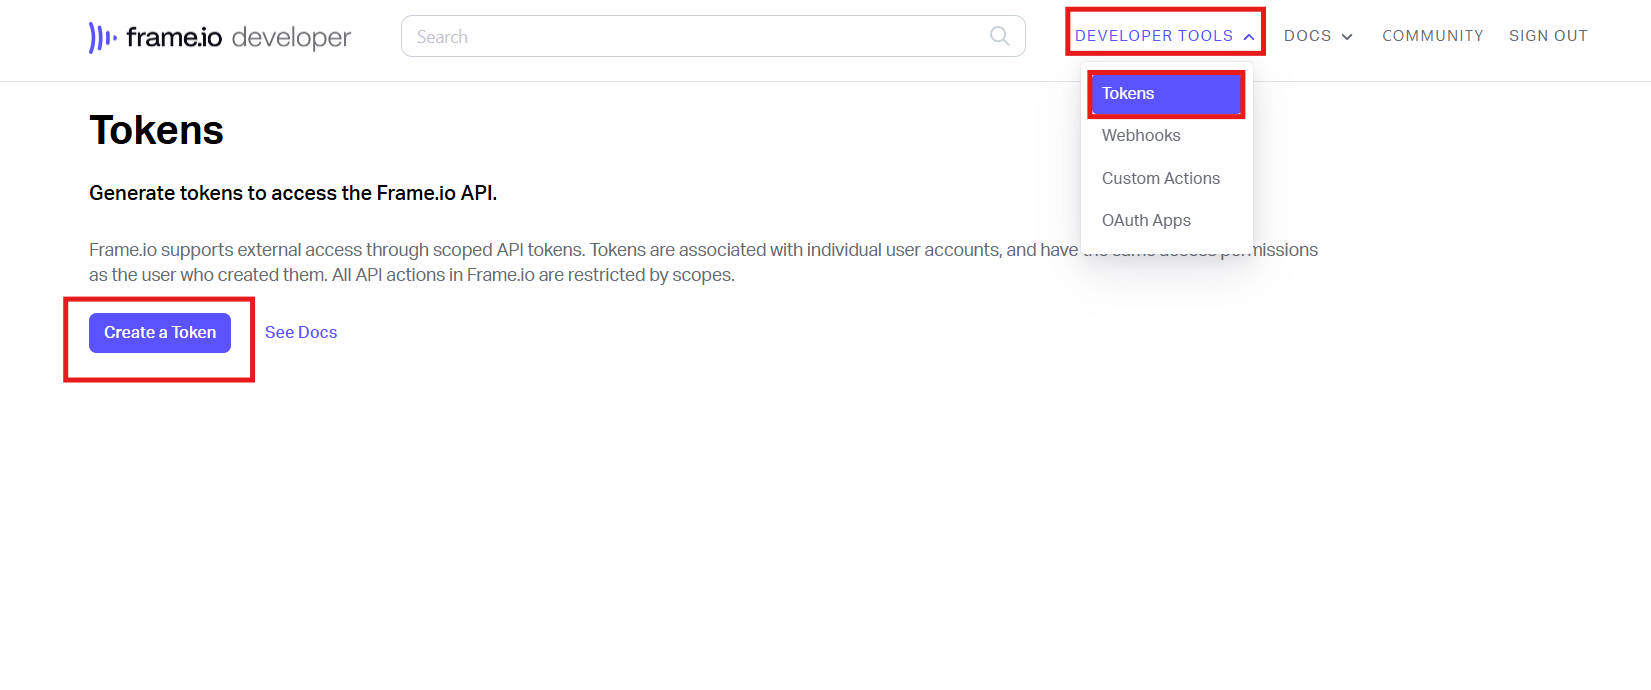
A Frameio Developer Token is a persistent bearer token that carries the same access and permissions as the user who generated it. Keep it confidential, and revoke it from the Developer Portal if it is ever compromised.
3. Connection Settings and Configuration for OneTeg
In OneTeg, navigate to Connections and create a new connection using the Frameio Connector. Choose your preferred authentication method below.
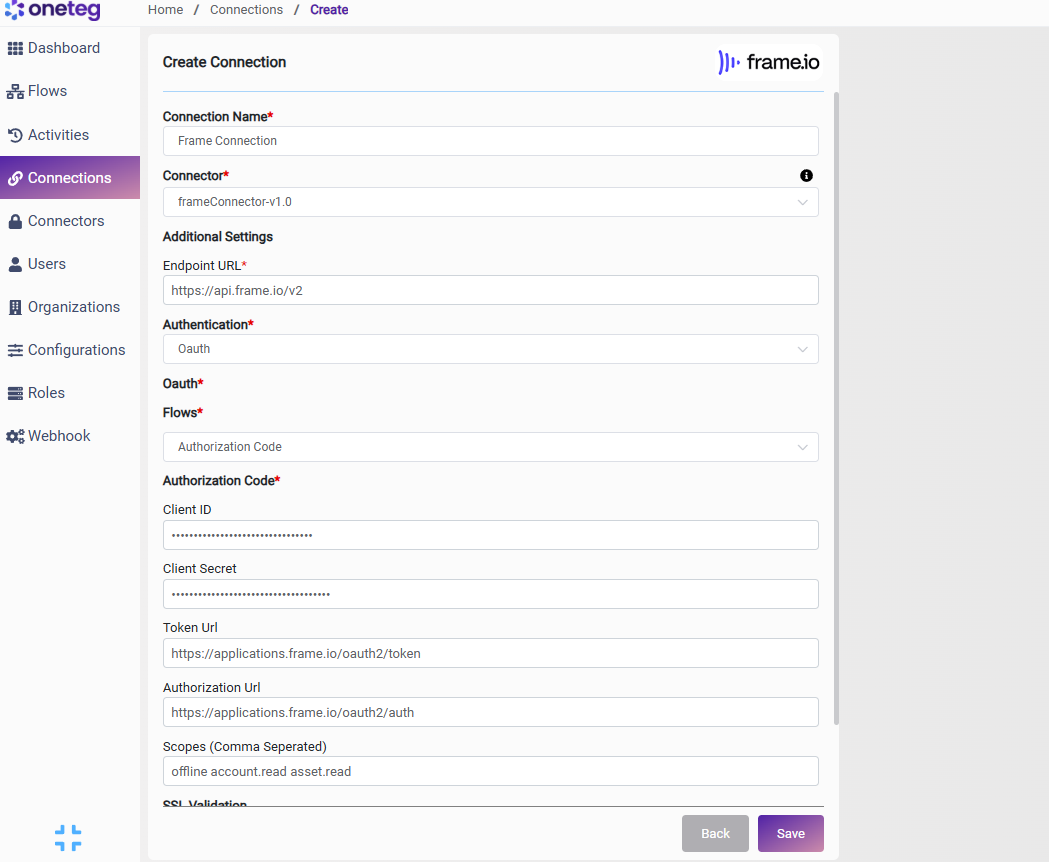
Option 1 — OAuth Authorization Code
Use this option for production integrations requiring user-delegated access. Requires an OAuth app from the Frameio Developer Portal (Steps 1–3).
|
Settings Parameters |
Value / Sample Value |
Description |
Required (Y/N) |
|
Connection Name |
Frame Connection |
Choose a name for your Connection |
Y |
|
Connector |
frameConnector-v1.0 |
Auto-populated once the Frameio Connector is selected |
Y |
|
Endpoint URL |
The base URL of the Frameio Legacy REST API (V2) |
Y |
|
|
Authentication |
Oauth |
Select Oauth as the authentication method |
Y |
|
Flows |
Authorization Code |
Select Authorization Code as the OAuth flow |
Y |
|
Client ID |
Your Frameio OAuth App Client ID |
The Client ID from your OAuth app in the Frameio Developer Portal |
Y |
|
Client Secret |
Your Frameio OAuth App Client Secret |
The Client Secret from your OAuth app. Leave empty if your app uses PKCE |
N |
|
Token Url |
The Frameio OAuth token endpoint used to exchange authorization codes for access tokens |
Y |
|
|
Authorization Url |
The Frameio OAuth authorization endpoint where users grant access |
Y |
|
|
Scopes |
offline account.read asset.read |
Space-delimited list of OAuth scopes. Include offline to enable refresh tokens. Add write scopes as needed |
Y |
Option 2 — Bearer Token
Use this option for single-user integrations or quick setup. Requires a Frameio Developer Token (Step 4).
|
Settings Parameters |
Value / Sample Value |
Description |
Required (Y/N) |
|
Connection Name |
Frame Connection |
Choose a name for your Connection |
Y |
|
Connector |
frameConnector-v1.0 |
Auto-populated once the Frameio Connector is selected |
Y |
|
Endpoint URL |
The base URL of the Frameio Legacy REST API (V2) |
Y |
|
|
Authentication |
Bearer |
Select Bearer as the authentication method |
Y |
|
token |
Your Frameio Developer Token |
A Frameio Developer Token generated from the Developer Portal (see Step 4). This persistent bearer token carries the same permissions as the user who created it |
Y |
4. Supported Frameio Actions and Options
For the full list of supported endpoints, parameters, and options, see the page below: