
1. General Information
Frontify is a cloud-based brand management platform that centralizes brand guidelines, digital assets, and creative collaboration in a single workspace. It enables organizations to store and organize logos, images, videos, templates, and other brand assets, enforce brand consistency, and share approved content across teams. Frontify exposes a GraphQL API that allows programmatic access to assets, libraries, and brand data.
The OneTeg Frontify Connector integrates with the Frontify GraphQL API, enabling users to access and manage brand assets directly from OneTeg automation workflows. This connector authenticates using a Bearer token in the form of a Frontify Personal Developer Token.
A Frontify Personal Developer Token grants access to your account with your personal permissions, scoped to the access you select when creating the token. These tokens are intended for use in integrations and internal tools and should be kept confidential.
2. Connect Frontify to OneTeg
The Frontify Connector authenticates using a Personal Developer Token generated from your Frontify instance. Follow the steps below to create your token.
Step 1 - Navigate to the Personal Developer Tokens Page
In your browser, go to your Frontify instance, login and append /oauth-access-token to your domain to open the Personal Developer Tokens page:
https://{your-domain}/oauth-access-token
For example, if your Frontify domain is http://developer-sandbox-oneteg.frontify.com , navigate to https://developer-sandbox-oneteg.frontify.com/oauth-access-token .
Step 2 - Create a New Token
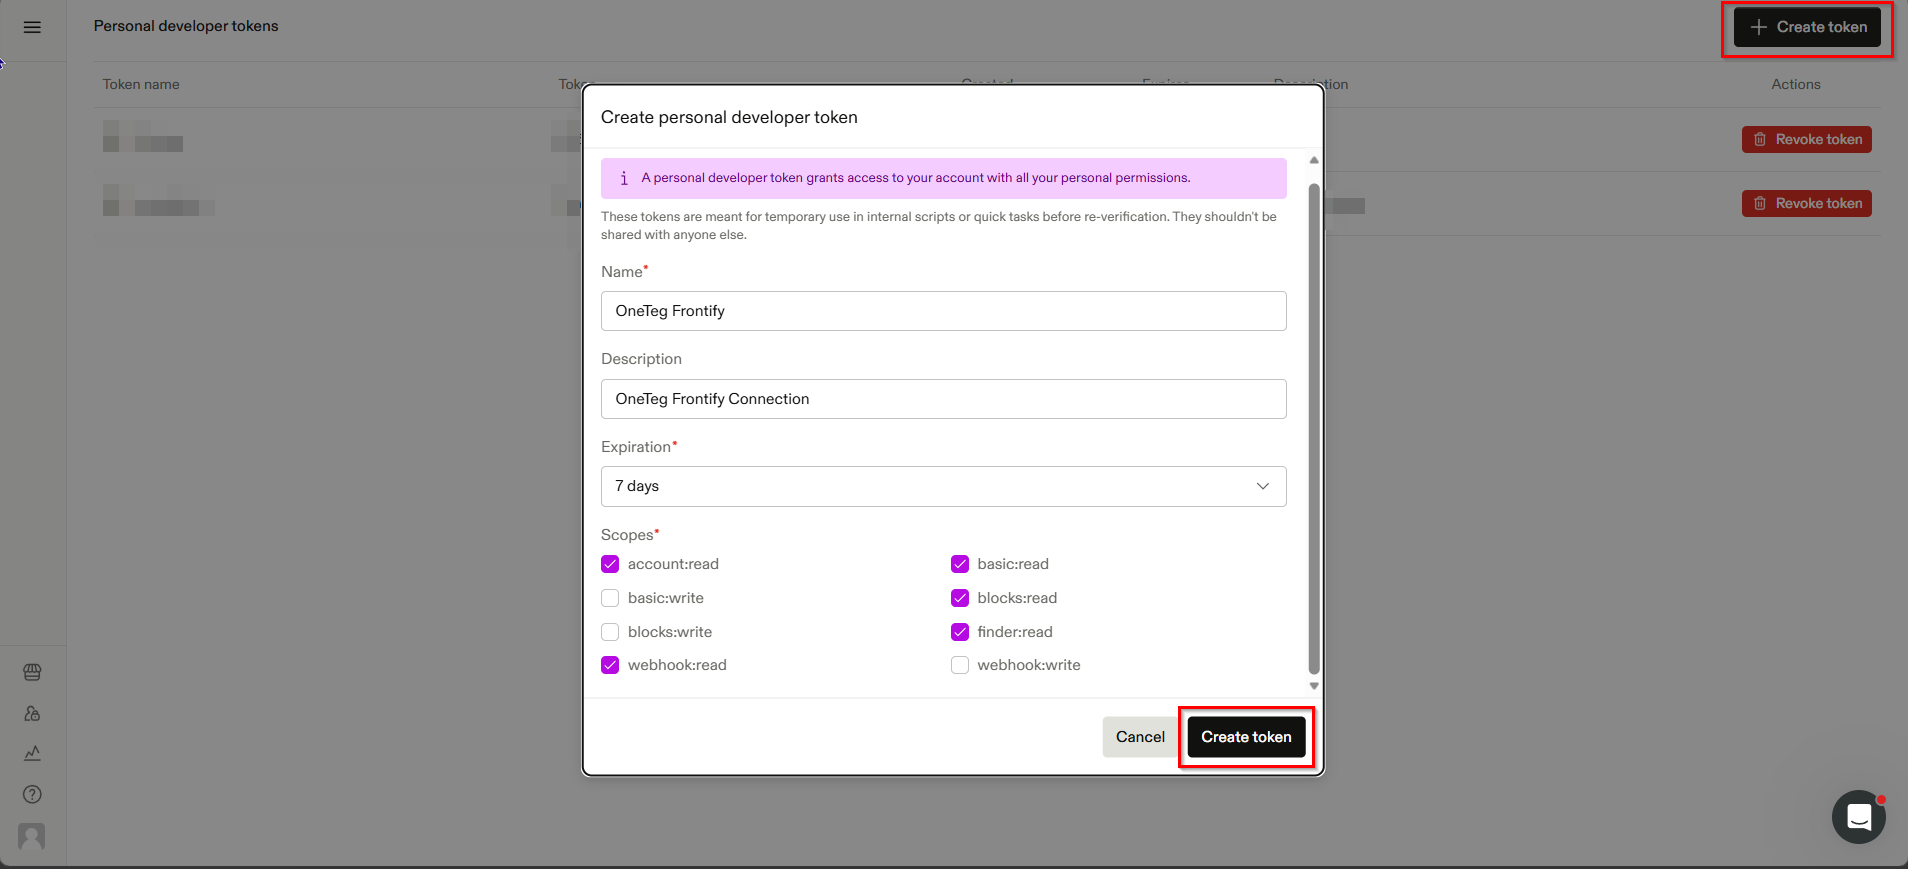
Click Create token in the top-right corner. In the Create personal developer token dialog, fill in the following:
Name — a descriptive name for the token, for example "OneTeg".
Description — an optional description to identify the token's purpose.
Expiration — select an expiration period for the token from the dropdown.
Scopes — select the permissions the token requires. For typical asset access, enable the read scopes you need (for example basic:read, blocks:read, finder:read). Add write scopes only if your workflow needs to modify data.
Step 3 - Generate and Copy the Token
Click Create token to generate the token. Copy the token value immediately and store it securely — it will be masked after you navigate away from the page. This is the value you will enter into the token field in OneTeg.
Personal Developer Tokens have an expiration date set during creation. When a token expires, you will need to generate a new one and update it in your OneTeg connection. Tokens can also be revoked at any time from the Personal Developer Tokens page.
3. Connection Settings and Configuration for OneTeg
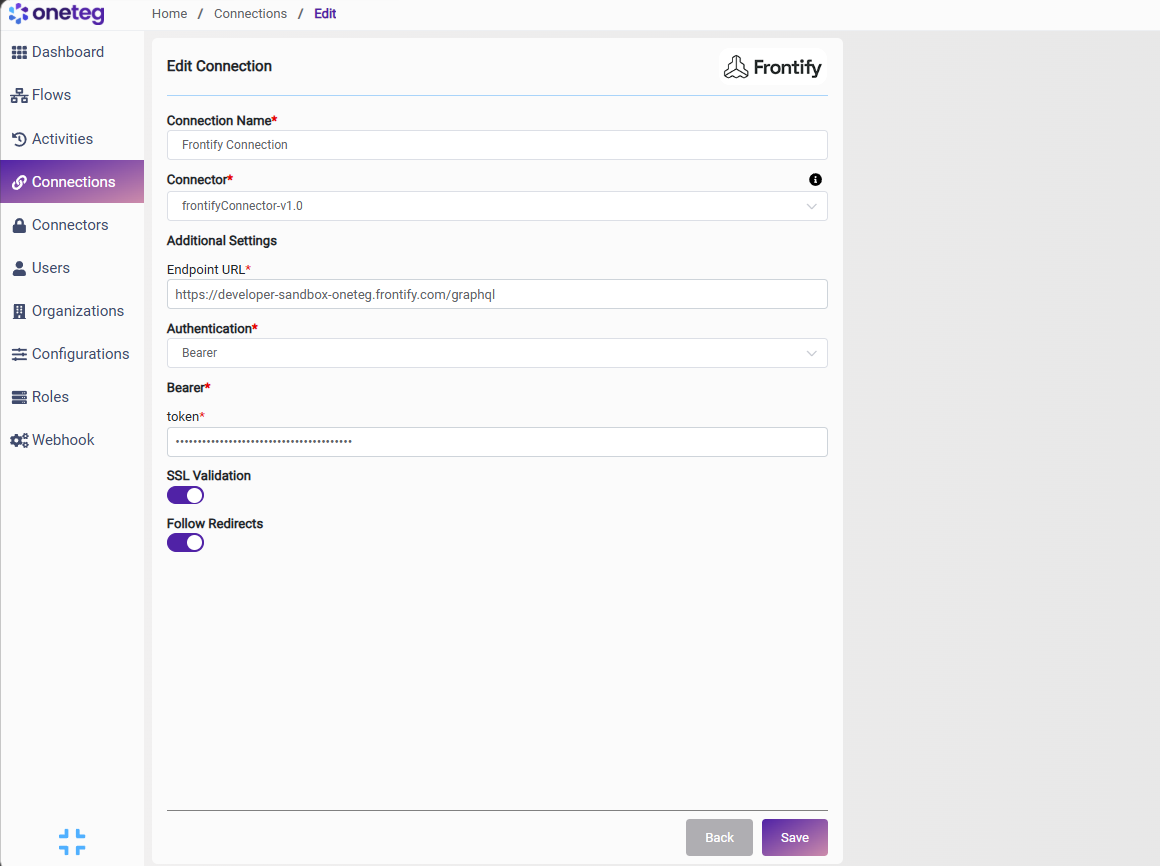
In OneTeg, navigate to Connections and create a new connection using the Frontify Connector. Fill in the fields below using the Personal Developer Token obtained in Section 2.
|
Settings Parameters |
Value / Sample Value |
Description |
Required (Y/N) |
|
Connection Name |
Frontify Connection |
Choose a name for your Connection |
Y |
|
Connector |
frontifyConnector-v1.0 |
Auto-populated once the Frontify Connector is selected |
Y |
|
Endpoint URL |
The Frontify GraphQL API endpoint: your Frontify domain with the /graphql path. Replace the domain with your own Frontify domain |
Y |
|
|
Authentication |
Bearer |
Select Bearer as the authentication method |
Y |
|
token |
Your Frontify Personal Developer Token |
The Personal Developer Token generated from your Frontify instance at /oauth-access-token (see Section 2) |
Y |
4. Supported Frontify Actions and Options
For the full list of supported endpoints, parameters, and options, see the page below: